一、路由
Vue.js 路由允许我们通过不同的 URL 访问不同的内容。
通过 Vue.js 可以实现多视图的单页Web应用(single page web application,SPA)。
Vue.js 路由需要载入 vue-router 库 , 中文文档 。
1.1 安装
直接下载 / CDN
https://unpkg.com/vue-router/dist/vue-router.js
NPM
推荐使用淘宝镜像:
cnpm install vue-router
1.2 简单实例
Vue.js + vue-router 可以很简单的实现单页应用。
是一个组件,该组件用于设置一个导航链接,切换不同 HTML 内容。 to 属性为目标地址, 即要显示的内容。
以下实例中我们将 vue-router 加进来,然后配置组件和路由映射,再告诉 vue-router 在哪里渲染它们。代码如下所示:
1
2
3
4
5
6
7
8
9
10
11
12
13
14
15
16
17
18
19
20
21
22
23
24
25
26
27
28
29
30
31
32
33
34
35
36
37
38
39
40
41
42
43
44
45
46
47
| <div id="app">
<h1>Hello App!</h1>
<p>
<!-- 使用 router-link 组件来导航. -->
<!-- 通过传入 `to` 属性指定链接. -->
<!-- <router-link> 默认会被渲染成一个 `<a>` 标签 -->
<router-link to="/foo">Go to Foo</router-link>
<router-link to="/bar">Go to Bar</router-link>
</p>
<!-- 路由出口 -->
<!-- 路由匹配到的组件将渲染在这里 -->
<router-view></router-view>
</div>
<script>
// 0. 如果使用模块化机制编程,導入Vue和VueRouter,要调用 Vue.use(VueRouter)
// 1. 定义(路由)组件。
// 可以从其他文件 import 进来
const Foo = { template: '<div>foo</div>' }
const Bar = { template: '<div>bar</div>' }
// 2. 定义路由
// 每个路由应该映射一个组件。 其中"component" 可以是
// 通过 Vue.extend() 创建的组件构造器,
// 或者,只是一个组件配置对象。
// 我们晚点再讨论嵌套路由。
const routes = [
{ path: '/foo', component: Foo },
{ path: '/bar', component: Bar }
]
// 3. 创建 router 实例,然后传 `routes` 配置
// 你还可以传别的配置参数, 不过先这么简单着吧。
const router = new VueRouter({
routes // (缩写)相当于 routes: routes
})
// 4. 创建和挂载根实例。
// 记得要通过 router 配置参数注入路由,
// 从而让整个应用都有路由功能
const app = new Vue({
router
}).$mount('#app')
// 现在,应用已经启动了!
</script>
|
点击过的导航链接都会加上样式 class ="router-link-exact-active router-link-active"。
1.3 相关属性
接下来我们可以了解下更多关于 的属性。
to
表示目标路由的链接。 当被点击后,内部会立刻把 to 的值传到 router.push(),所以这个值可以是一个字符串或者是描述目标位置的对象。
1
2
3
4
5
6
7
8
9
10
11
12
13
14
15
16
17
18
19
| <!-- 字符串 -->
<router-link to="home">Home</router-link>
<!-- 渲染结果 -->
<a href="home">Home</a>
<!-- 使用 v-bind 的 JS 表达式 -->
<router-link v-bind:to="'home'">Home</router-link>
<!-- 不写 v-bind 也可以,就像绑定别的属性一样 -->
<router-link :to="'home'">Home</router-link>
<!-- 同上 -->
<router-link :to="{ path: 'home' }">Home</router-link>
<!-- 命名的路由 -->
<router-link :to="{ name: 'user', params: { userId: 123 }}">User</router-link>
<!-- 带查询参数,下面的结果为 /register?plan=private -->
<router-link :to="{ path: 'register', query: { plan: 'private' }}">Register</router-link>
|
replace
设置 replace 属性的话,当点击时,会调用 router.replace() 而不是 router.push(),导航后不会留下 history 记录。
1
| <router-link :to="{ path: '/abc'}" replace></router-link>
|
append
设置 append 属性后,则在当前 (相对) 路径前添加其路径。例如,我们从 /a 导航到一个相对路径 b,如果没有配置 append,则路径为 /b,如果配了,则为 /a/b
1
| <router-link :to="{ path: 'relative/path'}" append></router-link>
|
tag
有时候想要 渲染成某种标签,例如 。 于是我们使用 tag prop 类指定何种标签,同样它还是会监听点击,触发导航。
1
2
3
| <router-link to="/foo" tag="li">foo</router-link>
<!-- 渲染结果 -->
<li>foo</li>
|
active-class
设置 链接激活时使用的 CSS 类名。可以通过以下代码来替代。
1
2
3
4
5
6
7
8
9
| <style>
._active{
background-color : red;
}
</style>
<p>
<router-link v-bind:to = "{ path: '/route1'}" active-class = "_active">Router Link 1</router-link>
<router-link v-bind:to = "{ path: '/route2'}" tag = "span">Router Link 2</router-link>
</p>
|
注意:这里 class 使用 active-class="_active"。
exact-active-class
配置当链接被精确匹配的时候应该激活的 class。可以通过以下代码来替代。
1
2
3
4
| <p>
<router-link v-bind:to = "{ path: '/route1'}" exact-active-class = "_active">Router Link 1</router-link>
<router-link v-bind:to = "{ path: '/route2'}" tag = "span">Router Link 2</router-link>
</p>
|
event
声明可以用来触发导航的事件。可以是一个字符串或是一个包含字符串的数组。
1
| <router-link v-bind:to = "{ path: '/route1'}" event = "mouseover">Router Link 1</router-link>
|
以上代码设置了 event 为 mouseover ,及在鼠标移动到 Router Link 1 上时导航的 HTML 内容会发生改变。
1.4 NPM 路由实例
你也可以在 Github 上下载: https://github.com/chrisvfritz/vue-2.0-simple-routing-example
下载完后,解压该目录,重命名目录为 vue-demo,vu 并进入该目录,执行以下命令:
1
2
3
4
5
| # 安装依赖,使用淘宝资源命令 cnpm
cnpm install
# 启动应用,地址为 localhost:8080
cnpm run dev
|
如果你需要发布到正式环境可以执行以下命令:
cnpm run build
执行成功后,访问 http://localhost:8080 即可看到如下界面:
二、过渡 & 动画
2.1 过渡
Vue 在插入、更新或者移除 DOM 时,提供多种不同方式的应用过渡效果。
Vue 提供了内置的过渡封装组件,该组件用于包裹要实现过渡效果的组件。
2.1.1 语法格式
1
2
3
| <transition name = "nameoftransition">
<div></div>
</transition>
|
2.1.2 示例
我们可以通过以下实例来理解 Vue 的过渡是如何实现的:
1
2
3
4
5
6
7
8
9
10
11
12
13
14
15
16
17
18
19
20
21
22
23
24
25
26
27
28
29
30
31
| <style>
/* 可以设置不同的进入和离开动画 */
/* 设置持续时间和动画函数 */
.fade-enter-active, .fade-leave-active {
transition: opacity 2s
}
.fade-enter, .fade-leave-to /* .fade-leave-active, 2.1.8 版本以下 */ {
opacity: 0
}
</style>
<div id = "databinding">
<button v-on:click = "show = !show">点我</button>
<transition name = "fade">
<p v-show = "show" v-bind:style = "styleobj">动画实例</p>
</transition>
</div>
<script type = "text/javascript">
var vm = new Vue({
el: '#databinding',
data: {
show:true,
styleobj :{
fontSize:'30px',
color:'red'
}
},
methods : {
}
});
</script>
|
实例中通过点击 "点我" 按钮将变量 show 的值从 true 变为 false。如果为 true 显示子元素 p 标签的内容。
下面这段代码展示了 transition 标签包裹了 p 标签:
1
2
3
| <transition name = "fade">
<p v-show = "show" v-bind:style = "styleobj">动画实例</p>
</transition>
|
过渡其实就是一个淡入淡出的效果。Vue在元素显示与隐藏的过渡中,提供了 6 个 class 来切换:
v-enter:定义进入过渡的开始状态。在元素被插入之前生效,在元素被插入之后的下一帧移除。
v-enter-active:定义进入过渡生效时的状态。在整个进入过渡的阶段中应用,在元素被插入之前生效,在过渡/动画完成之后移除。这个类可以被用来定义进入过渡的过程时间,延迟和曲线函数。
v-enter-to: 2.1.8版及以上 定义进入过渡的结束状态。在元素被插入之后下一帧生效 (与此同时 v-enter 被移除),在过渡/动画完成之后移除。
v-leave: 定义离开过渡的开始状态。在离开过渡被触发时立刻生效,下一帧被移除。
v-leave-active:定义离开过渡生效时的状态。在整个离开过渡的阶段中应用,在离开过渡被触发时立刻生效,在过渡/动画完成之后移除。这个类可以被用来定义离开过渡的过程时间,延迟和曲线函数。
v-leave-to: 2.1.8版及以上 定义离开过渡的结束状态。在离开过渡被触发之后下一帧生效 (与此同时 v-leave 被删除),在过渡/动画完成之后移除。
![]()
对于这些在过渡中切换的类名来说,如果你使用一个没有名字的 ,则 v- 是这些类名的默认前缀。如果你使用了 ,那么 v-enter 会替换为 my-transition-enter。
v-enter-active 和 v-leave-active 可以控制进入/离开过渡的不同的缓和曲线,在下面章节会有个示例说明。
2.2 CSS 过渡
通常我们都使用 CSS 过渡来实现效果。
1
2
3
4
5
6
7
8
9
10
11
12
13
14
15
16
17
18
19
20
21
22
23
24
25
26
27
28
29
30
| <style>
/* 可以设置不同的进入和离开动画 */
/* 设置持续时间和动画函数 */
.slide-fade-enter-active {
transition: all .3s ease;
}
.slide-fade-leave-active {
transition: all .8s cubic-bezier(1.0, 0.5, 0.8, 1.0);
}
.slide-fade-enter, .slide-fade-leave-to
/* .slide-fade-leave-active 用于 2.1.8 以下版本 */ {
transform: translateX(10px);
opacity: 0;
}
</style>
<div id = "databinding">
<button v-on:click = "show = !show">点我</button>
<transition name="slide-fade">
<p v-if="show">菜鸟教程</p>
</transition>
</div>
<script type = "text/javascript">
new Vue({
el: '#databinding',
data: {
show: true
}
})
</script>
|
2.3 CSS 动画
CSS 动画用法类似 CSS 过渡,但是在动画中 v-enter 类名在节点插入 DOM 后不会立即删除,而是在 animationend 事件触发时删除。
1
2
3
4
5
6
7
8
9
10
11
12
13
14
15
16
17
18
19
20
21
22
23
24
25
26
27
28
29
30
31
32
33
34
| <style>
.bounce-enter-active {
animation: bounce-in .5s;
}
.bounce-leave-active {
animation: bounce-in .5s reverse;
}
@keyframes bounce-in {
0% {
transform: scale(0);
}
50% {
transform: scale(1.5);
}
100% {
transform: scale(1);
}
}
</style>
<div id = "databinding">
<button v-on:click = "show = !show">点我</button>
<transition name="bounce">
<p v-if="show">菜鸟教程 -- 学的不仅是技术,更是梦想!!!</p>
</transition>
</div>
<script type = "text/javascript">
new Vue({
el: '#databinding',
data: {
show: true
}
})
</script>
|
2.4 自定义过渡的类名
我们可以通过以下特性来自定义过渡类名:
enter-class
enter-active-class
enter-to-class (2.1.8+)
leave-class
leave-active-class
leave-to-class (2.1.8+)
自定义过渡的类名优先级高于普通的类名,这样就能很好的与第三方(如:animate.css)的动画库结合使用。
1
2
3
4
5
6
7
8
9
10
11
12
13
14
15
16
17
18
19
20
21
22
23
24
25
26
27
28
29
| <!DOCTYPE html>
<html>
<head>
<meta charset="utf-8">
<title>Vue 测试实例 - 菜鸟教程(runoob.com)</title>
<script src="https://cdn.staticfile.org/vue/2.2.2/vue.min.js"></script>
<link href="https://cdn.jsdelivr.net/npm/animate.css@3.5.1" rel="stylesheet" type="text/css">
</head>
<body>
<div id = "databinding">
<button v-on:click = "show = !show">点我</button>
<transition
name="custom-classes-transition"
enter-active-class="animated tada"
leave-active-class="animated bounceOutRight"
>
<p v-if="show">菜鸟教程 -- 学的不仅是技术,更是梦想!!!</p>
</transition>
</div>
<script type = "text/javascript">
new Vue({
el: '#databinding',
data: {
show: true
}
})
</script>
</body>
</html>
|
同时使用过渡和动画
Vue 为了知道过渡的完成,必须设置相应的事件监听器。它可以是 transitionend 或 animationend ,这取决于给元素应用的 CSS 规则。如果你使用其中任何一种,Vue 能自动识别类型并设置监听。
但是,在一些场景中,你需要给同一个元素同时设置两种过渡动效,比如 animation 很快的被触发并完成了,而 transition 效果还没结束。在这种情况中,你就需要使用 type 特性并设置 animation 或 transition 来明确声明你需要 Vue 监听的类型。
显性的过渡持续时间
在很多情况下,Vue 可以自动得出过渡效果的完成时机。默认情况下,Vue 会等待其在过渡效果的根元素的第一个 transitionend 或 animationend 事件。然而也可以不这样设定——比如,我们可以拥有一个精心编排的一系列过渡效果,其中一些嵌套的内部元素相比于过渡效果的根元素有延迟的或更长的过渡效果。
在这种情况下你可以用 组件上的 duration 属性定制一个显性的过渡持续时间 (以毫秒计):
1
| <transition :duration="1000">...</transition>
|
你也可以定制进入和移出的持续时间:
1
| <transition :duration="{ enter: 500, leave: 800 }">...</transition>
|
2.5 JavaScript 钩子
可以在属性中声明 JavaScript 钩子:
HTML 代码
1
2
3
4
5
6
7
8
9
10
11
12
13
| <transition
v-on:before-enter="beforeEnter"
v-on:enter="enter"
v-on:after-enter="afterEnter"
v-on:enter-cancelled="enterCancelled"
v-on:before-leave="beforeLeave"
v-on:leave="leave"
v-on:after-leave="afterLeave"
v-on:leave-cancelled="leaveCancelled"
>
<!-- ... -->
</transition>
|
JavaScript 代码
1
2
3
4
5
6
7
8
9
10
11
12
13
14
15
16
17
18
19
20
21
22
23
24
25
26
27
28
29
30
31
32
33
34
35
36
37
38
39
40
41
42
43
44
|
// ...
methods: {
  // --------
  // 进入中
  // --------

  beforeEnter: function (el) {
    // ...
  },
  // 此回调函数是可选项的设置
  // 与 CSS 结合时使用
  enter: function (el, done) {
    // ...
    done()
  },
  afterEnter: function (el) {
    // ...
  },
  enterCancelled: function (el) {
    // ...
  },

  // --------
  // 离开时
  // --------

  beforeLeave: function (el) {
    // ...
  },
  // 此回调函数是可选项的设置
  // 与 CSS 结合时使用
  leave: function (el, done) {
    // ...
    done()
  },
  afterLeave: function (el) {
    // ...
  },
  // leaveCancelled 只用于 v-show 中
  leaveCancelled: function (el) {
    // ...
  }
}
|
这些钩子函数可以结合 CSS transitions/animations 使用,也可以单独使用。
当只用 JavaScript 过渡的时候,在 enter 和 leave 中必须使用 done 进行回调。否则,它们将被同步调用,过渡会立即完成。
推荐对于仅使用 JavaScript 过渡的元素添加 v-bind:css="false",Vue 会跳过 CSS 的检测。这也可以避免过渡过程中 CSS 的影响。
一个使用 Velocity.js 的简单例子:
1
2
3
4
5
6
7
8
9
10
11
12
13
14
15
16
17
18
19
20
21
22
23
24
25
26
27
28
29
30
31
32
33
34
35
36
37
38
39
40
41
42
43
44
45
46
47
48
49
50
| <!DOCTYPE html>
<html>
<head>
<meta charset="utf-8">
<title>Vue 测试实例 - 菜鸟教程(runoob.com)</title>
<script src="https://cdn.staticfile.org/vue/2.2.2/vue.min.js"></script>
<script src="https://cdnjs.cloudflare.com/ajax/libs/velocity/1.2.3/velocity.min.js"></script>
</head>
<body>
<div id = "databinding">
<button v-on:click = "show = !show">点我</button>
<transition
v-on:before-enter="beforeEnter"
v-on:enter="enter"
v-on:leave="leave"
v-bind:css="false"
>
<p v-if="show">菜鸟教程 -- 学的不仅是技术,更是梦想!!!</p>
</transition>
</div>
<script type = "text/javascript">
new Vue({
el: '#databinding',
data: {
show: false
},
methods: {
beforeEnter: function (el) {
el.style.opacity = 0
el.style.transformOrigin = 'left'
},
enter: function (el, done) {
Velocity(el, { opacity: 1, fontSize: '1.4em' }, { duration: 300 })
Velocity(el, { fontSize: '1em' }, { complete: done })
},
leave: function (el, done) {
Velocity(el, { translateX: '15px', rotateZ: '50deg' }, { duration: 600 })
Velocity(el, { rotateZ: '100deg' }, { loop: 2 })
Velocity(el, {
rotateZ: '45deg',
translateY: '30px',
translateX: '30px',
opacity: 0
}, { complete: done })
}
}
})
</script>
</body>
</html>
|
2.6 初始渲染的过渡
可以通过 appear 特性设置节点在初始渲染的过渡
1
2
3
| <transition appear>
<!-- ... -->
</transition>
|
这里默认和进入/离开过渡一样,同样也可以自定义 CSS 类名。
1
2
3
4
5
6
7
8
| <transition
appear
appear-class="custom-appear-class"
appear-to-class="custom-appear-to-class" (2.1.8+)
appear-active-class="custom-appear-active-class"
>
<!-- ... -->
</transition>
|
自定义 JavaScript 钩子:
1
2
3
4
5
6
7
8
9
| <transition
appear
v-on:before-appear="customBeforeAppearHook"
v-on:appear="customAppearHook"
v-on:after-appear="customAfterAppearHook"
v-on:appear-cancelled="customAppearCancelledHook"
>
<!-- ... -->
</transition>
|
多个元素的过渡
我们可以设置多个元素的过渡,一般列表与描述:
需要注意的是当有相同标签名的元素切换时,需要通过 key 特性设置唯一的值来标记以让 Vue 区分它们,否则 Vue 为了效率只会替换相同标签内部的内容。
1
2
3
4
5
6
| <transition>
<table v-if="items.length > 0">
<!-- ... -->
</table>
<p v-else>抱歉,没有找到您查找的内容。</p>
</transition>
|
如下实例:
1
2
3
4
5
6
7
8
| <transition>
<button v-if="isEditing" key="save">
Save
</button>
<button v-else key="edit">
Edit
</button>
</transition>
|
在一些场景中,也可以通过给同一个元素的 key 特性设置不同的状态来代替 v-if 和 v-else,上面的例子可以重写为:
1
2
3
4
5
| <transition>
<button v-bind:key="isEditing">
{{ isEditing ? 'Save' : 'Edit' }}
</button>
</transition>
|
使用多个 v-if 的多个元素的过渡可以重写为绑定了动态属性的单个元素过渡。例如:
1
2
3
4
5
6
7
8
9
10
11
| <transition>
<button v-if="docState === 'saved'" key="saved">
Edit
</button>
<button v-if="docState === 'edited'" key="edited">
Save
</button>
<button v-if="docState === 'editing'" key="editing">
Cancel
</button>
</transition>
|
可以重写为:
1
2
3
4
5
6
7
8
9
10
11
12
13
14
15
16
| <transition>
<button v-bind:key="docState">
{{ buttonMessage }}
</button>
</transition>
// ...
computed: {
buttonMessage: function () {
switch (this.docState) {
case 'saved': return 'Edit'
case 'edited': return 'Save'
case 'editing': return 'Cancel'
}
}
}
|
三、混入
混入 (mixins)定义了一部分可复用的方法或者计算属性。混入对象可以包含任意组件选项。当组件使用混入对象时,所有混入对象的选项将被混入该组件本身的选项。
3.1 简单使用
来看一个简单的实例:
1
2
3
4
5
6
7
8
9
10
11
12
13
14
15
16
17
18
19
20
21
22
23
24
25
| <div id = "databinding"></div>
<script type = "text/javascript">
var vm = new Vue({
el: '#databinding',
data: {
},
methods : {
},
});
// 定义一个混入对象
var myMixin = {
created: function () {
this.startmixin()
},
methods: {
startmixin: function () {
document.write("欢迎来到混入实例");
}
}
};
var Component = Vue.extend({
mixins: [myMixin]
})
var component = new Component();
</script>
|
3.2 选项合并
当组件和混入对象含有同名选项时,这些选项将以恰当的方式混合。
比如,数据对象在内部会进行浅合并 (一层属性深度),在和组件的数据发生冲突时以组件数据优先。
以下实例中,Vue 实例与混入对象包含了相同的方法。从输出结果可以看出两个选项合并了。
1
2
3
4
5
6
7
8
9
10
11
12
13
14
| <div id = "databinding"></div>
<script type = "text/javascript">
var mixin = {
created: function () {
document.write('混入调用' + '<br>')
}
}
new Vue({
mixins: [mixin],
created: function () {
document.write('组件调用' + '<br>')
}
});
</script>
|
输出结果为:
混入调用
组件调用
如果 methods 选项中有相同的函数名,则 Vue 实例优先级会较高。如下实例,Vue 实例与混入对象的 methods 选项都包含了相同的函数:
1
2
3
4
5
6
7
8
9
10
11
12
13
14
15
16
17
18
19
20
21
22
23
24
25
26
27
| <div id = "databinding"></div>
<script type = "text/javascript">
var mixin = {
methods: {
hellworld: function () {
document.write('HelloWorld 方法' + '<br>');
},
samemethod: function () {
document.write('Mixin:相同方法名' + '<br>');
}
}
};
var vm = new Vue({
mixins: [mixin],
methods: {
start: function () {
document.write('start 方法' + '<br>');
},
samemethod: function () {
document.write('Main:相同方法名' + '<br>');
}
}
});
vm.hellworld();
vm.start();
vm.samemethod();
</script>
|
输出结果为:
HelloWorld 方法
start 方法
Main:相同方法名
以上实例,我们调用了以下三个方法:
1
2
3
| vm.hellworld();
vm.start();
vm.samemethod();
|
从输出结果 methods 选项中如果碰到相同的函数名则 Vue 实例有更高的优先级会执行输出。
3.3 全局混入
也可以全局注册混入对象。注意使用! 一旦使用全局混入对象,将会影响到 所有 之后创建的 Vue 实例。使用恰当时,可以为自定义对象注入处理逻辑。
1
2
3
4
5
6
7
8
9
10
11
12
13
14
15
16
| <script type = "text/javascript">
// 为自定义的选项 'myOption' 注入一个处理器。
Vue.mixin({
created: function () {
var myOption = this.$options.myOption
if (myOption) {
document.write(myOption)
}
}
})
new Vue({
myOption: 'hello!'
})
// => "hello!"
</script>
|
谨慎使用全局混入对象,因为会影响到每个单独创建的 Vue 实例 (包括第三方模板)。
四、 Ajax(axios)
Vue.js 2.0 版本推荐使用 axios 来完成 ajax 请求。
Axios 是一个基于 Promise 的 HTTP 库,可以用在浏览器和 node.js 中。
Github开源地址: https://github.com/axios/axios
4.1 安装方法
使用 cdn:
1
| <script src="https://unpkg.com/axios/dist/axios.min.js"></script>
|
或
1
| <script src="https://cdn.staticfile.org/axios/0.18.0/axios.min.js"></script>
|
使用 npm:
npm install axios
使用 bower:
bower install axios
使用 yarn:
yarn add axios
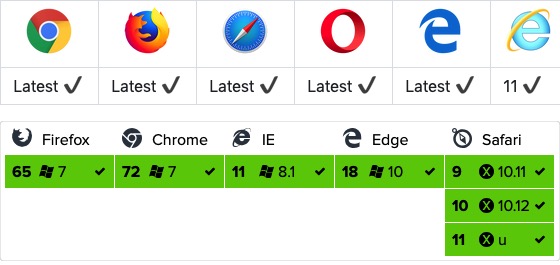
4.2 浏览器支持情况
![]()
4.3 GET 方法
我们可以简单的读取 JSON 数据:
1
2
3
4
5
6
7
8
9
10
11
12
13
14
15
16
17
18
19
20
21
22
23
24
25
26
27
28
29
30
31
32
| <!DOCTYPE html>
<html>
<head>
<meta charset="utf-8">
<title>Vue 测试实例 - 菜鸟教程(runoob.com)</title>
<script src="https://cdn.staticfile.org/vue/2.4.2/vue.min.js"></script>
<script src="https://cdn.staticfile.org/axios/0.18.0/axios.min.js"></script>
</head>
<body>
<div id="app">
{{ info }}
</div>
<script type = "text/javascript">
new Vue({
el: '#app',
data () {
return {
info: null
}
},
mounted () {
axios
.get('https://www.runoob.com/try/ajax/json_demo.json')
.then(response => (this.info = response))
.catch(function (error) { // 请求失败处理
console.log(error);
});
}
})
</script>
</body>
</html>
|
使用 response.data 读取 JSON 数据:
1
2
3
4
5
6
7
8
9
10
11
12
13
14
15
16
17
18
19
20
21
22
23
24
25
26
| <div id="app">
<h1>网站列表</h1>
<div
v-for="site in info"
>
{{ site.name }}
</div>
</div>
<script type = "text/javascript">
new Vue({
el: '#app',
data () {
return {
info: null
}
},
mounted () {
axios
.get('https://www.runoob.com/try/ajax/json_demo.json')
.then(response => (this.info = response.data.sites))
.catch(function (error) { // 请求失败处理
console.log(error);
});
}
})
</script>
|
GET 方法传递参数格式如下:
1
2
3
4
5
6
7
8
9
10
11
12
13
14
15
16
17
18
19
20
21
| // 直接在 URL 上添加参数 ID=12345
axios.get('/user?ID=12345')
.then(function (response) {
console.log(response);
})
.catch(function (error) {
console.log(error);
});
// 也可以通过 params 设置参数:
axios.get('/user', {
params: {
ID: 12345
}
})
.then(function (response) {
console.log(response);
})
.catch(function (error) {
console.log(error);
});
|
4.4 POST 方法
1
2
3
4
5
6
7
8
9
10
11
12
13
14
15
16
17
18
19
20
21
| <div id="app">
{{ info }}
</div>
<script type = "text/javascript">
new Vue({
el: '#app',
data () {
return {
info: null
}
},
mounted () {
axios
.post('https://www.runoob.com/try/ajax/demo_axios_post.php')
.then(response => (this.info = response))
.catch(function (error) { // 请求失败处理
console.log(error);
});
}
})
</script>
|
POST 方法传递参数格式如下:
1
2
3
4
5
6
7
8
9
10
| axios.post('/user', {
firstName: 'Fred', // 参数 firstName
lastName: 'Flintstone' // 参数 lastName
})
.then(function (response) {
console.log(response);
})
.catch(function (error) {
console.log(error);
});
|
4.5 执行多个并发请求
1
2
3
4
5
6
7
8
9
10
11
| function getUserAccount() {
return axios.get('/user/12345');
}
function getUserPermissions() {
return axios.get('/user/12345/permissions');
}
axios.all([getUserAccount(), getUserPermissions()])
.then(axios.spread(function (acct, perms) {
// 两个请求现在都执行完成
}));
|
4.6 axios API
可以通过向 axios 传递相关配置来创建请求。
1
2
3
4
5
6
7
8
9
10
11
12
13
14
15
16
17
18
19
20
21
22
| axios(config)
// 发送 POST 请求
axios({
method: 'post',
url: '/user/12345',
data: {
firstName: 'Fred',
lastName: 'Flintstone'
}
});
// GET 请求远程图片
axios({
method:'get',
url:'http://bit.ly/2mTM3nY',
responseType:'stream'
})
.then(function(response) {
response.data.pipe(fs.createWriteStream('ada_lovelace.jpg'))
});
axios(url[, config])
// 发送 GET 请求(默认的方法)
axios('/user/12345');
|
请求方法的别名
为方便使用,官方为所有支持的请求方法提供了别名,可以直接使用别名来发起请求:
1
2
3
4
5
6
7
| axios.request(config)
axios.get(url[, config])
axios.delete(url[, config])
axios.head(url[, config])
axios.post(url[, data[, config]])
axios.put(url[, data[, config]])
axios.patch(url[, data[, config]])
|
注意:在使用别名方法时, url、method、data 这些属性都不必在配置中指定。
并发
处理并发请求的助手函数:
1
2
| axios.all(iterable)
axios.spread(callback)
|
创建实例
可以使用自定义配置新建一个 axios 实例:
1
2
3
4
5
6
| axios.create([config])
const instance = axios.create({
baseURL: 'https://some-domain.com/api/',
timeout: 1000,
headers: {'X-Custom-Header': 'foobar'}
});
|
实例方法
以下是可用的实例方法。指定的配置将与实例的配置合并:
1
2
3
4
5
6
7
| axios#request(config)
axios#get(url[, config])
axios#delete(url[, config])
axios#head(url[, config])
axios#post(url[, data[, config]])
axios#put(url[, data[, config]])
axios#patch(url[, data[, config]])
|
请求配置项
下面是创建请求时可用的配置选项,注意只有 url 是必需的。如果没有指定 method,请求将默认使用 get 方法。
1
2
3
4
5
6
7
8
9
10
11
12
13
14
15
16
17
18
19
20
21
22
23
24
25
26
27
28
29
30
31
32
33
34
35
36
37
38
39
40
41
42
43
44
45
46
47
48
49
50
51
52
53
54
55
56
57
58
59
60
61
62
63
64
65
66
67
68
69
70
71
72
73
74
75
76
77
78
79
80
81
82
83
84
85
86
87
88
89
90
91
92
93
94
95
96
97
98
99
100
101
102
103
104
105
106
107
108
109
110
111
112
113
114
115
116
117
118
119
120
121
122
123
124
125
| {
// `url` 是用于请求的服务器 URL
url: "/user",
// `method` 是创建请求时使用的方法
method: "get", // 默认是 get
// `baseURL` 将自动加在 `url` 前面,除非 `url` 是一个绝对 URL。
// 它可以通过设置一个 `baseURL` 便于为 axios 实例的方法传递相对 URL
baseURL: "https://some-domain.com/api/",
// `transformRequest` 允许在向服务器发送前,修改请求数据
// 只能用在 "PUT", "POST" 和 "PATCH" 这几个请求方法
// 后面数组中的函数必须返回一个字符串,或 ArrayBuffer,或 Stream
transformRequest: [function (data) {
// 对 data 进行任意转换处理
return data;
}],
// `transformResponse` 在传递给 then/catch 前,允许修改响应数据
transformResponse: [function (data) {
// 对 data 进行任意转换处理
return data;
}],
// `headers` 是即将被发送的自定义请求头
headers: {"X-Requested-With": "XMLHttpRequest"},
// `params` 是即将与请求一起发送的 URL 参数
// 必须是一个无格式对象(plain object)或 URLSearchParams 对象
params: {
ID: 12345
},
// `paramsSerializer` 是一个负责 `params` 序列化的函数
// (e.g. https://www.npmjs.com/package/qs, http://api.jquery.com/jquery.param/)
paramsSerializer: function(params) {
return Qs.stringify(params, {arrayFormat: "brackets"})
},
// `data` 是作为请求主体被发送的数据
// 只适用于这些请求方法 "PUT", "POST", 和 "PATCH"
// 在没有设置 `transformRequest` 时,必须是以下类型之一:
// - string, plain object, ArrayBuffer, ArrayBufferView, URLSearchParams
// - 浏览器专属:FormData, File, Blob
// - Node 专属: Stream
data: {
firstName: "Fred"
},
// `timeout` 指定请求超时的毫秒数(0 表示无超时时间)
// 如果请求花费了超过 `timeout` 的时间,请求将被中断
timeout: 1000,
// `withCredentials` 表示跨域请求时是否需要使用凭证
withCredentials: false, // 默认的
// `adapter` 允许自定义处理请求,以使测试更轻松
// 返回一个 promise 并应用一个有效的响应 (查阅 [response docs](#response-api)).
adapter: function (config) {
/* ... */
},
// `auth` 表示应该使用 HTTP 基础验证,并提供凭据
// 这将设置一个 `Authorization` 头,覆写掉现有的任意使用 `headers` 设置的自定义 `Authorization`头
auth: {
username: "janedoe",
password: "s00pers3cret"
},
// `responseType` 表示服务器响应的数据类型,可以是 "arraybuffer", "blob", "document", "json", "text", "stream"
responseType: "json", // 默认的
// `xsrfCookieName` 是用作 xsrf token 的值的cookie的名称
xsrfCookieName: "XSRF-TOKEN", // default
// `xsrfHeaderName` 是承载 xsrf token 的值的 HTTP 头的名称
xsrfHeaderName: "X-XSRF-TOKEN", // 默认的
// `onUploadProgress` 允许为上传处理进度事件
onUploadProgress: function (progressEvent) {
// 对原生进度事件的处理
},
// `onDownloadProgress` 允许为下载处理进度事件
onDownloadProgress: function (progressEvent) {
// 对原生进度事件的处理
},
// `maxContentLength` 定义允许的响应内容的最大尺寸
maxContentLength: 2000,
// `validateStatus` 定义对于给定的HTTP 响应状态码是 resolve 或 reject promise 。如果 `validateStatus` 返回 `true` (或者设置为 `null` 或 `undefined`),promise 将被 resolve; 否则,promise 将被 rejecte
validateStatus: function (status) {
return status >= 200 && status < 300; // 默认的
},
// `maxRedirects` 定义在 node.js 中 follow 的最大重定向数目
// 如果设置为0,将不会 follow 任何重定向
maxRedirects: 5, // 默认的
// `httpAgent` 和 `httpsAgent` 分别在 node.js 中用于定义在执行 http 和 https 时使用的自定义代理。允许像这样配置选项:
// `keepAlive` 默认没有启用
httpAgent: new http.Agent({ keepAlive: true }),
httpsAgent: new https.Agent({ keepAlive: true }),
// "proxy" 定义代理服务器的主机名称和端口
// `auth` 表示 HTTP 基础验证应当用于连接代理,并提供凭据
// 这将会设置一个 `Proxy-Authorization` 头,覆写掉已有的通过使用 `header` 设置的自定义 `Proxy-Authorization` 头。
proxy: {
host: "127.0.0.1",
port: 9000,
auth: : {
username: "mikeymike",
password: "rapunz3l"
}
},
// `cancelToken` 指定用于取消请求的 cancel token
// (查看后面的 Cancellation 这节了解更多)
cancelToken: new CancelToken(function (cancel) {
})
}
|
响应结构
axios请求的响应包含以下信息:
1
2
3
4
5
6
7
8
9
10
11
12
13
14
15
16
| {
// `data` 由服务器提供的响应
data: {},
// `status` HTTP 状态码
status: 200,
// `statusText` 来自服务器响应的 HTTP 状态信息
statusText: "OK",
// `headers` 服务器响应的头
headers: {},
// `config` 是为请求提供的配置信息
config: {}
}
|
使用 then 时,会接收下面这样的响应:
1
2
3
4
5
6
7
8
| axios.get("/user/12345")
.then(function(response) {
console.log(response.data);
console.log(response.status);
console.log(response.statusText);
console.log(response.headers);
console.log(response.config);
});
|
在使用 catch 时,或传递 rejection callback 作为 then 的第二个参数时,响应可以通过 error 对象可被使用。
配置的默认值
你可以指定将被用在各个请求的配置默认值。
全局的 axios 默认值:
1
2
3
| axios.defaults.baseURL = 'https://api.example.com';
axios.defaults.headers.common['Authorization'] = AUTH_TOKEN;
axios.defaults.headers.post['Content-Type'] = 'application/x-www-form-urlencoded';
|
自定义实例默认值:
1
2
3
4
5
6
7
| // 创建实例时设置配置的默认值
var instance = axios.create({
baseURL: 'https://api.example.com'
});
// 在实例已创建后修改默认值
instance.defaults.headers.common['Authorization'] = AUTH_TOKEN;
|
配置的优先顺序
配置会以一个优先顺序进行合并。这个顺序是:在 lib/defaults.js 找到的库的默认值,然后是实例的 defaults 属性,最后是请求的 config 参数。后者将优先于前者。这里是一个例子:
1
2
3
4
5
6
7
8
9
10
11
| // 使用由库提供的配置的默认值来创建实例
// 此时超时配置的默认值是 `0`
var instance = axios.create();
// 覆写库的超时默认值
// 现在,在超时前,所有请求都会等待 2.5 秒
instance.defaults.timeout = 2500;
// 为已知需要花费很长时间的请求覆写超时设置
instance.get('/longRequest', {
timeout: 5000
|
拦截器
在请求或响应被 then 或 catch 处理前拦截它们。
1
2
3
4
5
6
7
8
9
10
11
12
13
14
15
16
17
| // 添加请求拦截器
axios.interceptors.request.use(function (config) {
// 在发送请求之前做些什么
return config;
}, function (error) {
// 对请求错误做些什么
return Promise.reject(error);
});
// 添加响应拦截器
axios.interceptors.response.use(function (response) {
// 对响应数据做点什么
return response;
}, function (error) {
// 对响应错误做点什么
return Promise.reject(error);
});
|
如果你想在稍后移除拦截器,可以这样:
1
2
| var myInterceptor = axios.interceptors.request.use(function () {/*...*/});
axios.interceptors.request.eject(myInterceptor);
|
可以为自定义 axios 实例添加拦截器。
1
2
| var instance = axios.create();
instance.interceptors.request.use(function () {/*...*/});
|
错误处理:
1
2
3
4
5
6
7
8
9
10
11
12
13
| axios.get('/user/12345')
.catch(function (error) {
if (error.response) {
// 请求已发出,但服务器响应的状态码不在 2xx 范围内
console.log(error.response.data);
console.log(error.response.status);
console.log(error.response.headers);
} else {
// Something happened in setting up the request that triggered an Error
console.log('Error', error.message);
}
console.log(error.config);
});
|
可以使用 validateStatus 配置选项定义一个自定义 HTTP 状态码的错误范围。
1
2
3
4
5
| axios.get('/user/12345', {
validateStatus: function (status) {
return status < 500; // 状态码在大于或等于500时才会 reject
}
})
|
取消
使用 cancel token 取消请求。
Axios 的 cancel token API 基于cancelable promises proposal
可以使用 CancelToken.source 工厂方法创建 cancel token,像这样:
1
2
3
4
5
6
7
8
9
10
11
12
13
14
15
| var CancelToken = axios.CancelToken;
var source = CancelToken.source();
axios.get('/user/12345', {
cancelToken: source.token
}).catch(function(thrown) {
if (axios.isCancel(thrown)) {
console.log('Request canceled', thrown.message);
} else {
// 处理错误
}
});
// 取消请求(message 参数是可选的)
source.cancel('Operation canceled by the user.');
|
还可以通过传递一个 executor 函数到 CancelToken 的构造函数来创建 cancel token:
1
2
3
4
5
6
7
8
9
10
11
12
| var CancelToken = axios.CancelToken;
var cancel;
axios.get('/user/12345', {
cancelToken: new CancelToken(function executor(c) {
// executor 函数接收一个 cancel 函数作为参数
cancel = c;
})
});
// 取消请求
cancel();
|
注意:可以使用同一个 cancel token 取消多个请求。
axios 会默认序列化 JavaScript 对象为 JSON。 如果想使用 application/x-www-form-urlencoded 格式,你可以使用下面的配置。
浏览器
在浏览器环境,你可以使用 URLSearchParams API:
1
2
3
4
| const params = new URLSearchParams();
params.append('param1', 'value1');
params.append('param2', 'value2');
axios.post('/foo', params);
|
URLSearchParams 不是所有的浏览器均支持。
除此之外,你可以使用 qs 库来编码数据:
1
2
3
4
5
6
7
8
9
10
11
12
13
14
| const qs = require('qs');
axios.post('/foo', qs.stringify({ 'bar': 123 }));
// Or in another way (ES6),
import qs from 'qs';
const data = { 'bar': 123 };
const options = {
method: 'POST',
headers: { 'content-type': 'application/x-www-form-urlencoded' },
data: qs.stringify(data),
url,
};
axios(options);
|
Node.js 环境
在 node.js里, 可以使用 querystring 模块:
1
2
| const querystring = require('querystring');
axios.post('http://something.com/', querystring.stringify({ foo: 'bar' }));
|
当然,同浏览器一样,你还可以使用 qs 库。
Promises
axios 依赖原生的 ES6 Promise 实现而被支持。
如果你的环境不支持 ES6 Promise,你可以使用 polyfill。
TypeScript支持
axios 包含 TypeScript 的定义。
1
2
| import axios from "axios";
axios.get("/user?ID=12345");
|
五、Ajax(vue-resource)
Vue 要实现异步加载需要使用到 vue-resource 库。
Vue.js 2.0 版本推荐使用 axios 来完成 ajax 请求。
1
| <script src="https://cdn.staticfile.org/vue-resource/1.5.1/vue-resource.min.js"></script>
|
5.1 Get 请求
以下是一个简单的 Get 请求实例,请求地址是一个简单的 txt 文本:
1
2
3
4
5
6
7
8
9
10
11
12
13
14
15
16
17
18
19
20
21
22
23
| <div id="box">
<input type="button" @click="get()" value="点我异步获取数据(Get)">
</div>
<script type = "text/javascript">
window.onload = function(){
var vm = new Vue({
el:'#box',
data:{
msg:'Hello World!',
},
methods:{
get:function(){
//发送get请求
this.$http.get('/try/ajax/ajax_info.txt').then(function(res){
document.write(res.body);
},function(){
console.log('请求失败处理');
});
}
}
});
}
</script>
|
如果需要传递数据,可以使用 this.$http.get('get.php',{params : jsonData}) 格式,第二个参数 jsonData 就是传到后端的数据。
1
2
3
4
5
| this.$http.get('get.php',{params : {a:1,b:2}}).then(function(res){
document.write(res.body);
},function(res){
console.log(res.status);
});
|
5.2 post 请求
post 发送数据到后端,需要第三个参数 {emulateJSON:true}。
emulateJSON 的作用: 如果Web服务器无法处理编码为 application/json 的请求,你可以启用 emulateJSON 选项。
1
2
3
4
5
6
7
8
9
10
11
12
13
14
15
16
17
18
19
20
21
22
23
| <div id="box">
<input type="button" @click="post()" value="点我异步获取数据(Post)">
</div>
<script type = "text/javascript">
window.onload = function(){
var vm = new Vue({
el:'#box',
data:{
msg:'Hello World!',
},
methods:{
post:function(){
//发送 post 请求
this.$http.post('/try/ajax/demo_test_post.php',{name:"菜鸟教程",url:"http://www.runoob.com"},{emulateJSON:true}).then(function(res){
document.write(res.body);
},function(res){
console.log(res.status);
});
}
}
});
}
</script>
|
demo_test_post.php 代码如下:
1
2
3
4
5
6
7
| <?php
$name = isset($_POST['name']) ? htmlspecialchars($_POST['name']) : '';
$city = isset($_POST['url']) ? htmlspecialchars($_POST['url']) : '';
echo '网站名: ' . $name;
echo "\n";
echo 'URL 地址: ' .$city;
?>
|
5.3 语法 & API
你可以使用全局对象方式 Vue.http 或者在一个 Vue 实例的内部使用 this.$http来发起 HTTP 请求。
1
2
3
4
5
6
7
| // 基于全局Vue对象使用http
Vue.http.get('/someUrl', [options]).then(successCallback, errorCallback);
Vue.http.post('/someUrl', [body], [options]).then(successCallback, errorCallback);
// 在一个Vue实例内使用$http
this.$http.get('/someUrl', [options]).then(successCallback, errorCallback);
this.$http.post('/someUrl', [body], [options]).then(successCallback, errorCallback);
|
vue-resource 提供了 7 种请求 API(REST 风格):
1
2
3
4
5
6
7
| get(url, [options])
head(url, [options])
delete(url, [options])
jsonp(url, [options])
post(url, [body], [options])
put(url, [body], [options])
patch(url, [body], [options])
|
除了 jsonp 以外,另外 6 种的 API 名称是标准的 HTTP 方法。
options 参数说明:
| 参数 | 类型 | 描述 |
|---|
| url | string | 请求的目标URL |
| body | Object, FormData, string | 作为请求体发送的数据 |
| headers | Object | 作为请求头部发送的头部对象 |
| params | Object | 作为URL参数的参数对象 |
| method | string | HTTP方法 (例如GET,POST,...) |
| timeout | number | 请求超时(单位:毫秒) (0表示永不超时) |
| before | function(request) | 在请求发送之前修改请求的回调函数 |
| progress | function(event) | 用于处理上传进度的回调函数 ProgressEvent |
| credentials | boolean | 是否需要出示用于跨站点请求的凭据 |
| emulateHTTP | boolean | 是否需要通过设置X-HTTP-Method-Override头部并且以传统POST方式发送PUT,PATCH和DELETE请求。 |
| emulateJSON | boolean | 设置请求体的类型为application/x-www-form-urlencoded |
通过如下属性和方法处理一个请求获取到的响应对象:
| 参数 | 类型 | 描述 |
|---|
| url | string | 响应的 URL 源 |
| body | Object, Blob, string | 响应体数据 |
| headers | Header | 请求头部对象 |
| ok | boolean | 当 HTTP 响应码为 200 到 299 之间的数值时该值为 true |
| status | number | HTTP 响应码 |
| statusText | string | HTTP 响应状态 |
| 方法 | 类型 | 描述 |
| text() | 约定值 | 以字符串方式返回响应体 |
| json() | 约定值 | 以格式化后的 json 对象方式返回响应体 |
| blob() | 约定值 | 以二进制 Blob 对象方式返回响应体 |
5.4 使用 vue-resource 的 jsonp 处理跨域请求:
1
2
3
4
5
6
7
8
9
10
11
12
13
14
15
16
17
18
19
20
21
22
23
24
25
26
27
28
29
30
31
32
33
34
35
| <div id="app">
请输入关键字:<input type="text" v-model="keyword" @keyup="sendJsonP(keyword)">
<ul>
<li v-for="r in result">{{r}}</li>
</ul>
</div>
<script>
window.onload = function () {
new Vue({
el: '#app',
data: {
keyword: '',
result: ''
},
methods: {
sendJsonP(keyword) {
let url = 'https://www.baidu.com/sugrec?pre=1&p=3&ie=utf-8&json=1&prod=pc&from=pc_web';
this.$http.jsonp(url, {
params: {
wd: keyword
},
jsonp: 'cb'//jsonp默认是callback,百度缩写成了cb,所以需要指定下 }
}).then(res => {
if (res.data.g) {
this.result = res.data.g.map(x => x['q']);
} else {
this.result = [];
}
});
}
}
});
}
</script>
|
六、响应接口
Vue 可以添加数据动态响应接口。
6.1 简单使用
例如以下实例,我们通过使用 $watch 属性来实现数据的监听,$watch 必须添加在 Vue 实例之外才能实现正确的响应。
实例中通过点击按钮计数器会加 1。setTimeout 设置 10 秒后计算器的值加上 20 。
1
2
3
4
5
6
7
8
9
10
11
12
13
14
15
16
17
18
19
20
| <div id = "app">
<p style = "font-size:25px;">计数器: {{ counter }}</p>
<button @click = "counter++" style = "font-size:25px;">点我</button>
</div>
<script type = "text/javascript">
var vm = new Vue({
el: '#app',
data: {
counter: 1
}
});
vm.$watch('counter', function(nval, oval) {
alert('计数器值的变化 :' + oval + ' 变为 ' + nval + '!');
});
setTimeout(
function(){
vm.counter += 20;
},10000
);
</script>
|
Vue 不允许在已经创建的实例上动态添加新的根级响应式属性。
Vue 不能检测到对象属性的添加或删除,最好的方式就是在初始化实例前声明根级响应式属性,哪怕只是一个空值。
如果我们需要在运行过程中实现属性的添加或删除,则可以使用全局 Vue,Vue.set 和 Vue.delete 方法。
6.2 Vue.set
Vue.set 方法用于设置对象的属性,它可以解决 Vue 无法检测添加属性的限制,语法格式如下:
1
| Vue.set( target, key, value )
|
参数说明:
target: 可以是对象或数组
key : 可以是字符串或数字
value: 可以是任何类型
示例
1
2
3
4
5
6
7
8
9
10
11
12
13
14
15
16
17
18
| <div id = "app">
<p style = "font-size:25px;">计数器: {{ products.id }}</p>
<button @click = "products.id++" style = "font-size:25px;">点我</button>
</div>
<script type = "text/javascript">
var myproduct = {"id":1, name:"book", "price":"20.00"};
var vm = new Vue({
el: '#app',
data: {
products: myproduct
}
});
vm.products.qty = "1";
console.log(vm);
vm.$watch('products.id', function(nval, oval) {
alert('计数器值的变化 :' + oval + ' 变为 ' + nval + '!');
});
</script>
|
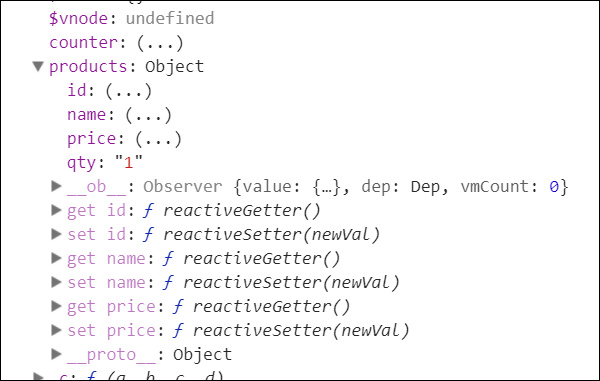
在以上实例中,使用以下代码在开始时创建了一个变量 myproduct:
1
| var myproduct = {"id":1, name:"book", "price":"20.00"};
|
该变量在赋值给了 Vue 实例的 data 对象:
var vm = new Vue({ el: '#app', data: { products: myproduct } });
如果我们想给 myproduct 数组添加一个或多个属性,我们可以在 Vue 实例创建后使用以下代码:
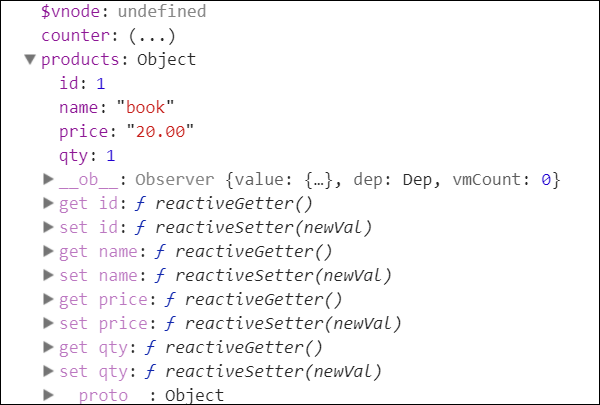
查看控制台输出:
![]()
如上图看到的,在产品中添加了数量属性 qty,但是 get/set 方法只可用于 id,name 和 price 属性,却不能在 qty 属性中使用。
我们不能通过添加 Vue 对象来实现响应。 Vue 主要在开始时创建所有属性。 如果我们要实现这个功能,可以通过 Vue.set 来实现:
1
2
3
4
5
6
7
8
9
10
11
12
13
14
15
16
17
18
19
|
<div id = "app">
<p style = "font-size:25px;">计数器: {{ products.id }}</p>
<button @click = "products.id++" style = "font-size:25px;">点我</button>
</div>
<script type = "text/javascript">
var myproduct = {"id":1, name:"book", "price":"20.00"};
var vm = new Vue({
   el: '#app',
   data: {
      products: myproduct
   }
});
Vue.set(myproduct, 'qty', 1);
console.log(vm);
vm.$watch('products.id', function(nval, oval) {
   alert('计数器值的变化 :' + oval + ' 变为 ' + nval + '!');
});
</script>
|
![]()
从控制台输出的结果可以看出 get/set 方法可用于qty 属性。
6.3 Vue.delete
Vue.delete 用于删除动态添加的属性 语法格式:
1
| Vue.delete( target, key )
|
参数说明:
target: 可以是对象或数组
key: 可以是字符串或数字
实例
1
2
3
4
5
6
7
8
9
10
11
12
13
14
15
16
17
18
| <div id = "app">
<p style = "font-size:25px;">计数器: {{ products.id }}</p>
<button @click = "products.id++" style = "font-size:25px;">点我</button>
</div>
<script type = "text/javascript">
var myproduct = {"id":1, name:"book", "price":"20.00"};
var vm = new Vue({
el: '#app',
data: {
products: myproduct
}
});
Vue.delete(myproduct, 'price');
console.log(vm);
vm.$watch('products.id', function(nval, oval) {
alert('计数器值的变化 :' + oval + ' 变为 ' + nval + '!');
});
</script>
|
以上实例中我们使用 Vue.delete 来删除 price 属性。以下是控制台输出结果:
![]()
从上图输出结果中,我们可以看到 price 属性已删除,只剩下了 id 和 name 属性,price 属性的 get/set 方法也已删除。