一、前言 在 《Spring Security添加图形验证码》 一节中,我们已经实现了基于Spring Boot + Spring Security的账号密码登录,并集成了图形验证码功能。时下另一种非常常见的网站登录方式为手机短信验证码登录,但Spring Security默认只提供了账号密码的登录认证逻辑,所以要实现手机短信验证码登录认证功能,我们需要模仿Spring Security账号密码登录逻辑代码来实现一套自己的认证逻辑。
二、短信验证码生成 我们在 《Spring Security自定义用户认证》 这一节Spring Security添加图形验证码的基础上来集成短信验证码登录的功能。
2.1 定义短信验证码对象 和图形验证码类似,我们先定义一个短信验证码对象SmsCode:
1
2
3
4
5
6
7
8
9
10
11
12
13
14
15
16
17
18
19
20
21
22
23
24
@Getter @Setter public class SmsCode implements Serializable { private static final long serialVersionUID = 3497935890426858542L; private String code; private LocalDateTime expireTime; public SmsCode(String code, int expireIn) { this.code = code; this.expireTime = LocalDateTime.now().plusSeconds(expireIn); } public SmsCode(String code, LocalDateTime expireTime) { this.code = code; this.expireTime = expireTime; } public boolean isExpire() { return LocalDateTime.now().isAfter(expireTime); } }
SmsCode对象包含了两个属性:code验证码和expireTime过期时间。isExpire方法用于判断短信验证码是否已过期。
2.2 生成短信验证码 接着在ValidateCodeController中生成短信验证码相关请求对应的方法:
1
2
3
4
5
6
7
8
9
10
11
12
13
14
15
16
17
18
@RestController public class ValidateCodeController { @GetMapping("/code/sms") public void createSmsCode(HttpServletResponse response, HttpSession session, String mobile) throws IOException { SmsCode smsCode = createSMSCode(); session.setAttribute("smsCodeObj", smsCode); session.setAttribute("smsCode", smsCode.getCode()); // 输出验证码到控制台代替短信发送服务 System.out.println(mobile + "您的登录验证码为:" + smsCode.getCode() + ",有效时间为60秒"); } private SmsCode createSMSCode() { String code = RandomStringUtils.randomNumeric(6); return new SmsCode(code, 60); } }
这里我们使用createSMSCode方法生成了一个6位的纯数字随机数,有效时间为60秒。然后通过SessionStrategy对象的setAttribute方法将短信验证码保存到了Session中,对应的key为smsCode。
至此,短信验证码生成模块编写完毕,下面开始改造登录页面。
2.3 登录页改造 1 2 3 4 5 6 7 8 9 10 11 12 13 14 15 16 17 18 19 20 21 22 23 24 25 26 27 28 29 30 31 32 33 34 35 36 <!DOCTYPE html> <html> <head> <meta charset="UTF-8"> <title>登录</title> <link rel="stylesheet" href="css/login.css" type="text/css"> <script src="https://cdn.staticfile.org/jquery/1.10.2/jquery.min.js"></script> </head> <body> <form class="login-page" action="/login/mobile" method="post"> <div class="form"> <h3>短信验证码登录</h3> <input type="text" placeholder="手机号" name="mobile" value="18888888888" required="required"/> <span style="display: inline"> <input type="text" name="smsCode" placeholder="短信验证码" style="width: 50%;"/> <a href="#" onclick="sendSmsCode()">发送验证码</a> </span> <button type="submit">登录</button> </div> </form> </body> <script inline="javascript"> function sendSmsCode() { var mobile = $("input[name='mobile']").val(); $.ajax({ type: "get", url: "/code/sms", data: {"mobile": mobile}, dataType: "json", success: function (r) { alert("发送成功"); } }); } </script> </html>
其中a标签的单击对应我们的短信验证码生成方法的请求URL。Form的action对应处理短信验证码登录方法的请求URL,这个方法下面在进行具体实现。
2.4 路径免验证改造 我们需要在Spring Security中配置/code/sms路径免验证:
1 2 3 4 5 6 7 8 9 10 11 12 13 14 15 16 17 @Override protected void configure(HttpSecurity http) throws Exception { http.formLogin() // 表单登录 // http.httpBasic() // HTTP Basic //.loginPage("/login.html") .loginPage("/authentication/require") // 登录跳转 URL .loginProcessingUrl("/login") .successHandler(authenticationSucessHandler) // 处理登录成功 .failureHandler(authenticationFailureHandler) // 处理登录失败 .and() .authorizeRequests() // 授权配置 //.antMatchers("/login.html").permitAll() .antMatchers("/authentication/require", "/login.html", "/code/sms").permitAll() // 登录跳转 URL 无需认证 .anyRequest() // 所有请求 .authenticated() // 都需要认证 .and().csrf().disable(); }
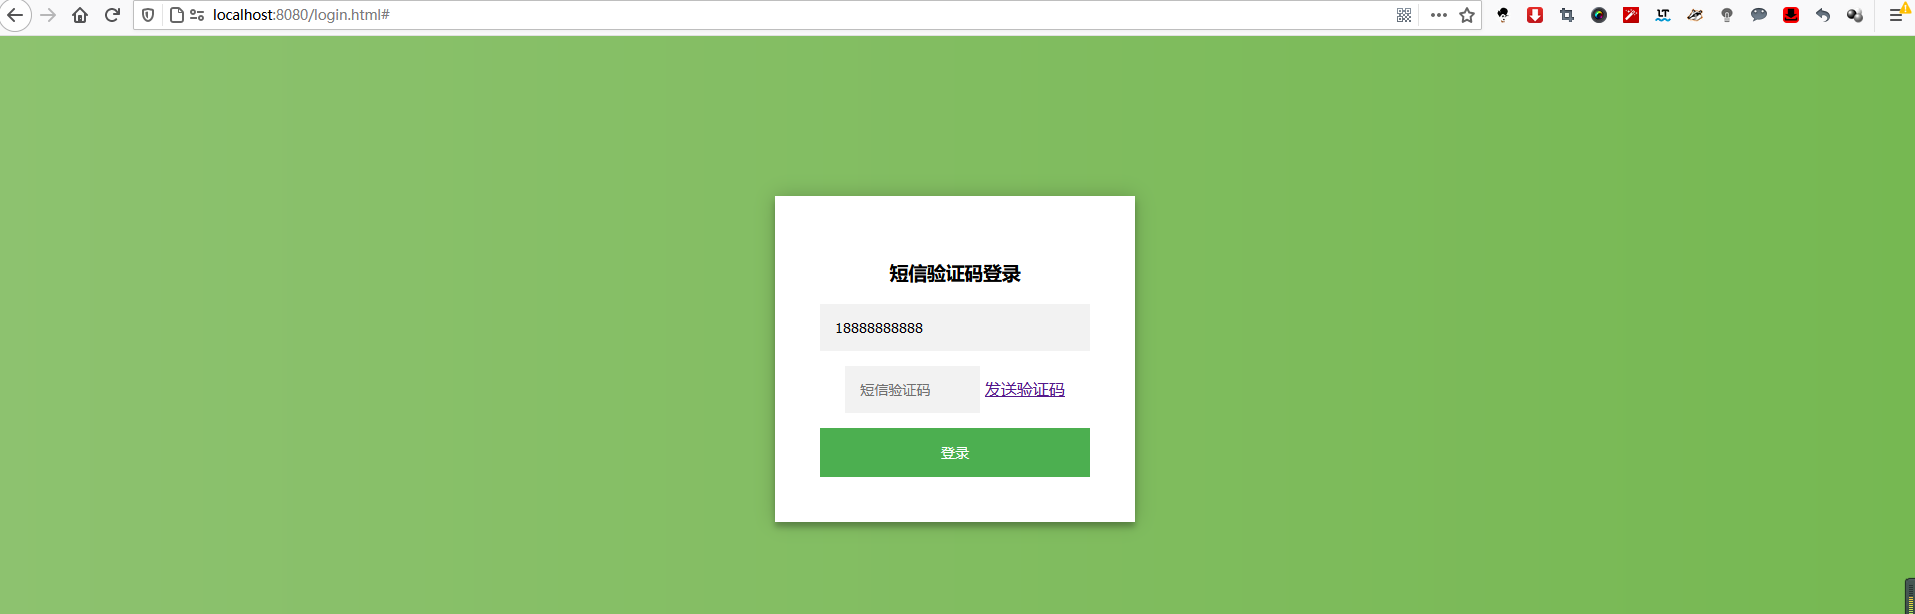
2.5 测试 重启项目,访问 http://localhost:8080/login.html :
点击发送验证码,控制台输出如下:
18888888888您的登录验证码为:548746,有效时间为60秒
接下来开始实现使用短信验证码登录认证逻辑。
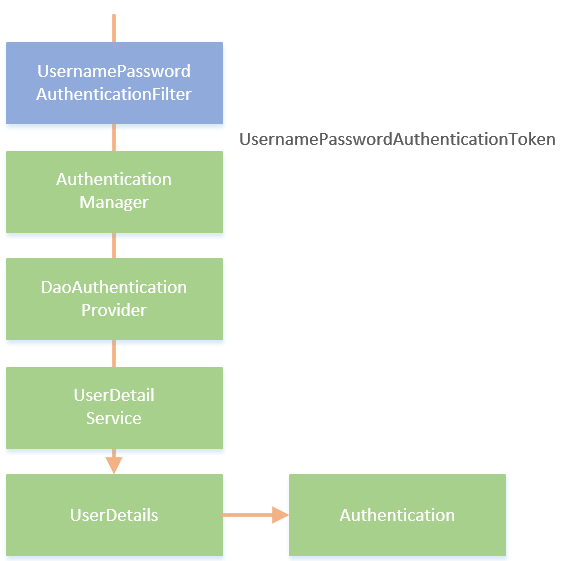
三、添加短信验证码认证 3.1 改造思想 在Spring Security中,使用用户名密码认证的过程大致如下图所示:
Spring Security使用UsernamePasswordAuthenticationFilter过滤器来拦截用户名密码认证请求,将用户名和密码封装成一个UsernamePasswordToken对象交给AuthenticationManager处理。AuthenticationManager将挑出一个支持处理该类型Token的AuthenticationProvider(这里为DaoAuthenticationProvider,AuthenticationProvider的其中一个实现类)来进行认证,认证过程中DaoAuthenticationProvider将调用UserDetailService的loadUserByUsername方法来处理认证,如果认证通过(即UsernamePasswordToken中的用户名和密码相符)则返回一个UserDetails类型对象,并将认证信息保存到Session中,认证后我们便可以通过Authentication对象获取到认证的信息了。
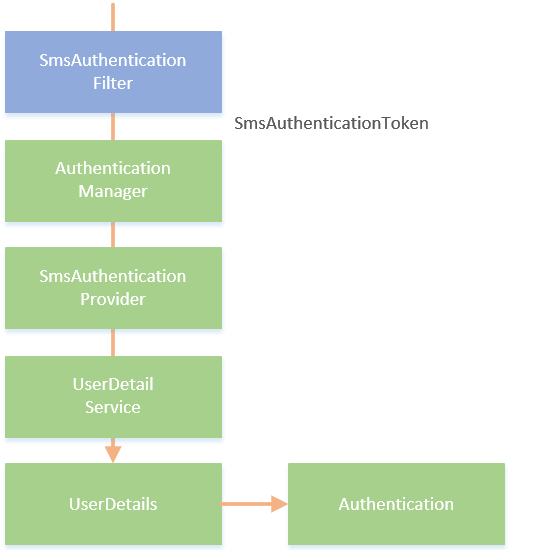
由于Spring Security并没用提供短信验证码认证的流程,所以我们需要仿照上面这个流程来实现:
为了实现这个流程,我们需要定义SmsAuthenticationFitler、SmsAuthenticationToken和SmsAuthenticationProvider,并将这些组建组合起来添加到Spring Security中。下面我们来逐步实现这个过程。
3.2 定义SmsAuthenticationToken 查看UsernamePasswordAuthenticationToken的源码,将其复制出来重命名为SmsAuthenticationToken,并稍作修改,修改后的代码如下所示:
1 2 3 4 5 6 7 8 9 10 11 12 13 14 15 16 17 18 19 20 21 22 23 24 25 26 27 28 29 30 31 32 33 34 35 36 37 38 public class SmsAuthenticationToken extends AbstractAuthenticationToken { private static final long serialVersionUID = 530L; private final Object principal; public SmsAuthenticationToken(String mobile) { super((Collection)null); this.principal = mobile; this.setAuthenticated(false); } public SmsAuthenticationToken(Object principal, Collection<? extends GrantedAuthority> authorities) { super(authorities); this.principal = principal; super.setAuthenticated(true); } public Object getCredentials() { return null; } public Object getPrincipal() { return this.principal; } public void setAuthenticated(boolean isAuthenticated) throws IllegalArgumentException { if (isAuthenticated) { throw new IllegalArgumentException("Cannot set this token to trusted - use constructor which takes a GrantedAuthority list instead"); } else { super.setAuthenticated(false); } } public void eraseCredentials() { super.eraseCredentials(); } }
SmsAuthenticationToken包含一个principal属性,从它的两个构造函数可以看出,在认证之前principal存的是手机号,认证之后存的是用户信息。UsernamePasswordAuthenticationToken原来还包含一个credentials属性用于存放密码,这里不需要就去掉了。
3.3 定义SmsAuthenticationFilter 定义完SmsAuthenticationToken后,我们接着定义用于处理短信验证码登录请求的过滤器SmsAuthenticationFilter,同样的复制UsernamePasswordAuthenticationFilter源码并稍作修改:
1 2 3 4 5 6 7 8 9 10 11 12 13 14 15 16 17 18 19 20 21 22 23 24 25 26 27 28 29 30 31 32 33 34 35 36 37 38 39 40 41 42 43 44 45 46 47 48 49 50 51 52 public class SmsAuthenticationFilter extends AbstractAuthenticationProcessingFilter { public static final String MOBILE_KEY = "mobile"; private String mobileParameter = MOBILE_KEY; private boolean postOnly = true; public SmsAuthenticationFilter() { super(new AntPathRequestMatcher("/login/mobile", "POST")); } public Authentication attemptAuthentication(HttpServletRequest request, HttpServletResponse response) throws AuthenticationException { if (this.postOnly && !request.getMethod().equals("POST")) { throw new AuthenticationServiceException("Authentication method not supported: " + request.getMethod()); } else { String mobile = obtainMobile(request); if (mobile == null) { mobile = ""; } mobile = mobile.trim(); SmsAuthenticationToken authRequest = new SmsAuthenticationToken(mobile); this.setDetails(request, authRequest); return this.getAuthenticationManager().authenticate(authRequest); } } @Nullable protected String obtainMobile(HttpServletRequest request) { return request.getParameter(this.mobileParameter); } protected void setDetails(HttpServletRequest request, SmsAuthenticationToken authRequest) { authRequest.setDetails(this.authenticationDetailsSource.buildDetails(request)); } public void setMobileParameter(String mobileParameter) { Assert.hasText(mobileParameter, "mobile parameter must not be empty or null"); this.mobileParameter = mobileParameter; } public void setPostOnly(boolean postOnly) { this.postOnly = postOnly; } public final String getMobileParameter() { return this.mobileParameter; } }
构造函数中指定了当请求为/login/mobile,请求方法为POST的时候该过滤器生效。mobileParameter属性值为mobile,对应登录页面手机号输入框的name属性。attemptAuthentication方法从请求中获取到mobile参数值,并调用SmsAuthenticationToken的SmsAuthenticationToken(String mobile)构造方法创建了一个SmsAuthenticationToken。下一步就如流程图中所示的那样,SmsAuthenticationFilter将SmsAuthenticationToken交给AuthenticationManager处理。
3.4 定义SmsAuthenticationProvider 在创建完SmsAuthenticationFilter后,我们需要创建一个支持处理该类型Token的类,即SmsAuthenticationProvider,该类需要实现AuthenticationProvider的两个抽象方法:
1 2 3 4 5 6 7 8 9 10 11 12 13 14 15 16 17 18 19 20 21 22 23 24 25 26 27 28 29 30 31 32 public class SmsAuthenticationProvider implements AuthenticationProvider { private MyUserDetailService userDetailService; @Override public Authentication authenticate(Authentication authentication) throws AuthenticationException { SmsAuthenticationToken authenticationToken = (SmsAuthenticationToken) authentication; UserDetails userDetails = userDetailService.loadUserByUsername((String) authenticationToken.getPrincipal()); if (userDetails == null) throw new InternalAuthenticationServiceException("未找到与该手机号对应的用户"); SmsAuthenticationToken authenticationResult = new SmsAuthenticationToken(userDetails, userDetails.getAuthorities()); authenticationResult.setDetails(authenticationToken.getDetails()); return authenticationResult; } @Override public boolean supports(Class<?> aClass) { return SmsAuthenticationToken.class.isAssignableFrom(aClass); } public MyUserDetailService getUserDetailService() { return userDetailService; } public void setUserDetailService(MyUserDetailService userDetailService) { this.userDetailService = userDetailService; } }
其中supports方法指定了支持处理的Token类型为SmsAuthenticationToken,authenticate方法用于编写具体的身份认证逻辑。在authenticate方法中,我们从SmsAuthenticationToken中取出了手机号信息,并调用了UserDetailService的loadUserByUsername方法。该方法在用户名密码类型的认证中,主要逻辑是通过用户名查询用户信息,如果存在该用户并且密码一致则认证成功;而在短信验证码认证的过程中,该方法需要通过手机号去查询用户,如果存在该用户则认证通过。认证通过后接着调用SmsAuthenticationToken的SmsAuthenticationToken(Object principal, Collection<? extends GrantedAuthority> authorities)构造函数构造一个认证通过的Token,包含了用户信息和用户权限。
你可能会问,为什么这一步没有进行短信验证码的校验呢?实际上短信验证码的校验是在SmsAuthenticationFilter之前完成的,即只有当短信验证码正确以后才开始走认证的流程。所以接下来我们需要定一个过滤器来校验短信验证码的正确性。
3.5 定义SmsCodeFilter 短信验证码的校验逻辑其实和图形验证码的校验逻辑基本一致,所以我们在图形验证码过滤器的基础上稍作修改,代码如下所示:
1 2 3 4 5 6 7 8 9 10 11 12 13 14 15 16 17 18 19 20 21 22 23 24 25 26 27 28 29 30 31 32 33 34 35 36 37 38 39 40 41 42 43 44 45 46 47 48 49 50 51 52 @Component @Slf4j public class SmsCodeFilter extends OncePerRequestFilter { @Autowired private AuthenticationFailureHandler authenticationFailureHandler; @Override protected void doFilterInternal(HttpServletRequest httpServletRequest, HttpServletResponse httpServletResponse, FilterChain filterChain) throws ServletException, IOException { if (StringUtils.equalsIgnoreCase("/login/mobile", httpServletRequest.getRequestURI()) && StringUtils.equalsIgnoreCase(httpServletRequest.getMethod(), "post")) { try { validateSmsCode(httpServletRequest); } catch (ValidateCodeException e) { authenticationFailureHandler.onAuthenticationFailure(httpServletRequest, httpServletResponse, e); return; } } filterChain.doFilter(httpServletRequest, httpServletResponse); } private void validateSmsCode(HttpServletRequest request) throws ServletRequestBindingException { String smsCodeInRequest = ServletRequestUtils.getStringParameter(request, "smsCode"); String mobile = ServletRequestUtils.getStringParameter(request, "mobile"); String code = (String) request.getSession().getAttribute("smsCode"); SmsCode smsCode = (SmsCode) request.getSession().getAttribute("smsCodeObj"); log.info("获取提交的验证码:{}",smsCodeInRequest); log.info("获取保存的验证码:{}",code); if (StringUtils.isBlank(smsCodeInRequest)) { throw new ValidateCodeException("验证码不能为空!"); } if (smsCode == null) { throw new ValidateCodeException("验证码不存在,请重新发送!"); } if (smsCode.isExpire()) { request.getSession().removeAttribute(request.getParameter("smsCodeObj")); throw new ValidateCodeException("验证码已过期,请重新发送!"); } if (!StringUtils.equalsIgnoreCase(smsCode.getCode(), smsCodeInRequest)) { throw new ValidateCodeException("验证码不正确!"); } request.getSession().removeAttribute(request.getParameter("smsCodeObj")); request.getSession().removeAttribute(request.getParameter("smsCode")); } }
方法的基本逻辑和之前定义的ValidateCodeFilter一致,这里不再赘述。
3.6 配置生效 在定义完所需的组件后,我们需要进行一些配置,将这些组件组合起来形成一个和上面流程图对应的流程。创建一个配置类SmsAuthenticationConfig:
1
2
3
4
5
6
7
8
9
10
11
12
13
14
15
16
17
18
19
20
21
22
23
24
25
26
27
@Component public class SmsAuthenticationConfig extends SecurityConfigurerAdapter<DefaultSecurityFilterChain, HttpSecurity> { @Autowired private AuthenticationSuccessHandler authenticationSuccessHandler; @Autowired private AuthenticationFailureHandler authenticationFailureHandler; @Autowired private MyUserDetailService userDetailService; @Override public void configure(HttpSecurity http) throws Exception { SmsAuthenticationFilter smsAuthenticationFilter = new SmsAuthenticationFilter(); smsAuthenticationFilter.setAuthenticationManager(http.getSharedObject(AuthenticationManager.class)); smsAuthenticationFilter.setAuthenticationSuccessHandler(authenticationSuccessHandler); smsAuthenticationFilter.setAuthenticationFailureHandler(authenticationFailureHandler); SmsAuthenticationProvider smsAuthenticationProvider = new SmsAuthenticationProvider(); smsAuthenticationProvider.setUserDetailService(userDetailService); http.authenticationProvider(smsAuthenticationProvider) .addFilterAfter(smsAuthenticationFilter, UsernamePasswordAuthenticationFilter.class); } }
在流程中第一步需要配置SmsAuthenticationFilter,分别设置了AuthenticationManager、AuthenticationSuccessHandler和AuthenticationFailureHandler属性。这些属性都是来自SmsAuthenticationFilter继承的AbstractAuthenticationProcessingFilter类中。
第二步配置SmsAuthenticationProvider,这一步只需要将我们自个的UserDetailService注入进来即可。
最后调用HttpSecurity的authenticationProvider方法指定了AuthenticationProvider为SmsAuthenticationProvider,并将SmsAuthenticationFilter过滤器添加到了UsernamePasswordAuthenticationFilter后面。
3.7 配置改造 最后一步需要做的是配置短信验证码校验过滤器,并且将短信验证码认证流程加入到Spring Security中。在BrowserSecurityConfig的configure方法中添加如下配置:
1
2
3
4
5
6
7
8
9
10
11
12
13
14
15
16
17
18
19
20
21
22
23
24
25
@Autowired private SmsCodeFilter smsCodeFilter; @Autowired private SmsAuthenticationConfig smsAuthenticationConfig; @Override protected void configure(HttpSecurity http) throws Exception { http.addFilterBefore(smsCodeFilter, UsernamePasswordAuthenticationFilter.class) // 添加短信验证码校验过滤器 .formLogin() // 表单登录 // http.httpBasic() // HTTP Basic //.loginPage("/login.html") .loginPage("/authentication/require") // 登录跳转 URL .loginProcessingUrl("/login") .successHandler(authenticationSucessHandler) // 处理登录成功 .failureHandler(authenticationFailureHandler) // 处理登录失败 .and() .authorizeRequests() // 授权配置 //.antMatchers("/login.html").permitAll() .antMatchers("/authentication/require", "/login.html", "/code/sms").permitAll() // 登录跳转 URL 无需认证 .anyRequest() // 所有请求 .authenticated() // 都需要认证 .and().csrf().disable() .apply(smsAuthenticationConfig); // 将短信验证码认证配置加到 Spring Security 中; }
具体含义见注释,这里不再赘述。
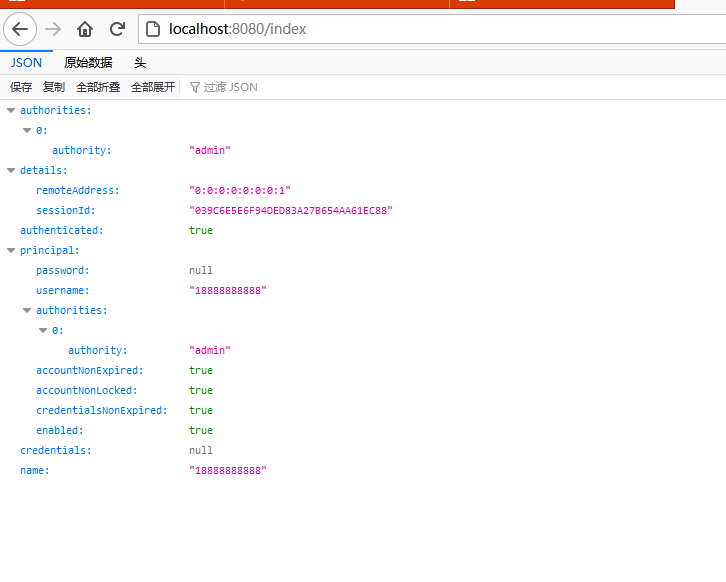
3.8 测试 重启项目,访问 http://localhost:8080/login.html ,点击发送验证码,控制台输出如下:
18888888888您的登录验证码为:826812,有效时间为60秒
输入该验证码,点击登录后页面如下所示:
认证成功。