一、前言 添加验证码大致可以分为三个步骤:根据随机数生成验证码图片;将验证码图片显示到登录页面;认证流程中加入验证码校验。Spring Security的认证校验是由UsernamePasswordAuthenticationFilter过滤器完成的,所以我们的验证码校验逻辑应该在这个过滤器之前。下面一起学习下如何在上一节Spring Security自定义用户认证的基础上加入验证码校验功能。
二、生成图形验证码 2.1 引入依赖 1 2 3 4 5 <dependency> <groupId>com.github.axet</groupId> <artifactId>kaptcha</artifactId> <version>0.0.9</version> </dependency>
2.2 kaptcha配置 增加kaptcha配置类KaptchaConfig.java
1 2 3 4 5 6 7 8 9 10 11 12 13 14 15 16 17 18 19 @Configuration public class KaptchaConfig { @Bean public DefaultKaptcha producer() { Properties properties = new Properties(); properties.put("kaptcha.border", "no"); properties.put("kaptcha.image.width","110"); properties.put("kaptcha.image.height","45"); properties.put("kaptcha.textproducer.font.size","35"); properties.put("kaptcha.textproducer.font.color", "black"); properties.put("kaptcha.textproducer.char.length", "5"); Config config = new Config(properties); DefaultKaptcha defaultKaptcha = new DefaultKaptcha(); defaultKaptcha.setConfig(config); return defaultKaptcha; } }
kaptcha可配置项:
配置项 含义 默认值 kaptcha.border 是否有边框 默认为true 我们可以自己设置yes,no kaptcha.border.color 边框颜色 默认为Color.BLACK kaptcha.border.thickness 边框粗细度 默认为1 kaptcha.producer.impl 验证码生成器 默认为DefaultKaptcha kaptcha.textproducer.impl 验证码文本生成器 默认为DefaultTextCreator kaptcha.textproducer.char.string 验证码文本字符内容范围 默认为abcde2345678gfynmnpwx kaptcha.textproducer.char.length 验证码文本字符长度 默认为5 kaptcha.textproducer.font.names 验证码文本字体样式 默认为new Font("Arial", 1, fontSize), new Font("Courier", 1, fontSize) kaptcha.textproducer.font.size 验证码文本字符大小 默认为40 kaptcha.textproducer.font.color 验证码文本字符颜色 默认为Color.BLACK kaptcha.textproducer.char.space 验证码文本字符间距 默认为2 kaptcha.noise.impl 验证码噪点生成对象 默认为DefaultNoise kaptcha.noise.color 验证码噪点颜色 默认为Color.BLACK kaptcha.obscurificator.impl 验证码样式引擎 默认为WaterRipple kaptcha.word.impl 验证码文本字符渲染 默认为DefaultWordRenderer kaptcha.background.impl 验证码背景生成器 默认为DefaultBackground kaptcha.background.clear.from 验证码背景颜色渐进 默认为Color.LIGHT_GRAY kaptcha.background.clear.to 验证码背景颜色渐进 默认为Color.WHITE kaptcha.image.width 验证码图片宽度 默认为200 kaptcha.image.height 验证码图片高度 默认为50
2.3 定义验证码对象 1 2 3 4 5 6 7 8 9 10 11 12 13 14 15 16 17 18 19 20 21 22 23 24 25 26 27 @Getter @Setter public class ImageCode { private BufferedImage image; private String code; private LocalDateTime expireTime; public ImageCode(BufferedImage image, String code, int expireIn) { this.image = image; this.code = code; this.expireTime = LocalDateTime.now().plusSeconds(expireIn); } public ImageCode(BufferedImage image, String code, LocalDateTime expireTime) { this.image = image; this.code = code; this.expireTime = expireTime; } public boolean isExpire() { return LocalDateTime.now().isAfter(expireTime); } }
2.4 生成验证码 接着定义一个ValidateCodeController,用于处理生成验证码请求:
1 2 3 4 5 6 7 8 9 10 11 12 13 14 15 16 17 18 19 20 21 22 23 24 25 26 27 28 @RestController public class ValidateController { @Autowired private Producer captchaProducer; @GetMapping(value = {"/captcha","/captcha.do","/code/image"}) public void getKaptchaImage(HttpServletResponse response, HttpSession session) throws Exception { response.setDateHeader("Expires", 0); response.setHeader("Pragma", "no-cache"); response.setHeader("Cache-Control", "no-store, no-cache, must-revalidate"); response.addHeader("Cache-Control", "post-check=0, pre-check=0"); response.setContentType("image/jpeg"); ImageCode imageCode = createImageCode(); session.setAttribute(Constants.KAPTCHA_SESSION_KEY, imageCode.getCode()); ServletOutputStream out = response.getOutputStream(); ImageIO.write(imageCode.getImage(), "jpg", out); } private ImageCode createImageCode() { int expireIn = 60; // 验证码有效时间 60s //生成验证码 String capText = captchaProducer.createText(); BufferedImage image = captchaProducer.createImage(capText); return new ImageCode(image, capText, expireIn); } }
createImageCode方法用于生成验证码对象,生成验证码的方法写好后,接下来开始改造登录页面。
三、改造登录 3.1 登录页改造 在登录页面加上如下代码:
1 2 3 4 <span style="display: inline"> <input type="text" name="imageCode" placeholder="验证码" style="width: 50%;"/> <img src="/code/image"/> </span>
3.2 配置改造 要使生成验证码的请求不被拦截,需要在BrowserSecurityConfig的configure方法中配置免拦截:
1 2 3 4 5 6 7 8 9 10 11 12 13 14 15 16 17 @Override protected void configure(HttpSecurity http) throws Exception { http.formLogin() // 表单登录 // http.httpBasic() // HTTP Basic //.loginPage("/login.html") .loginPage("/authentication/require") // 登录跳转 URL .loginProcessingUrl("/login") .successHandler(authenticationSucessHandler) // 处理登录成功 .failureHandler(authenticationFailureHandler) // 处理登录失败 .and() .authorizeRequests() // 授权配置 //.antMatchers("/login.html").permitAll() .antMatchers("/authentication/require", "/login.html", "/code/image").permitAll() // 登录跳转 URL 无需认证 .anyRequest() // 所有请求 .authenticated() // 都需要认证 .and().csrf().disable(); }
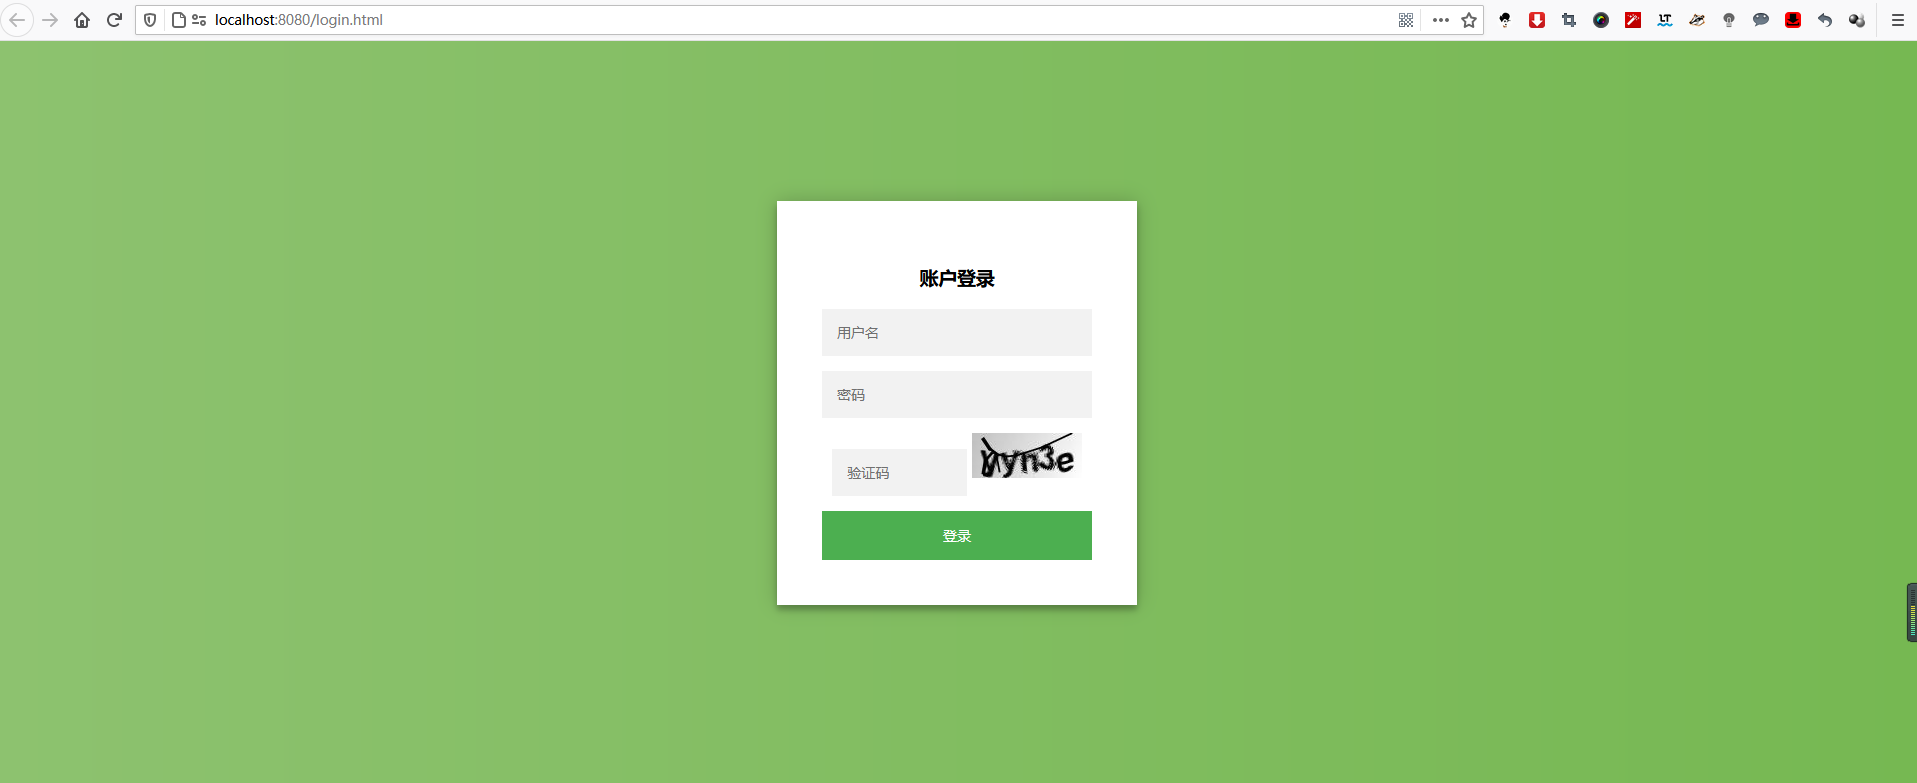
3.3 测试 重启项目,访问 http://localhost:8080/login.html ,效果如下:
四、认证流程添加验证码校验 4.1 定义异常类型 在校验验证码的过程中,可能会抛出各种验证码类型的异常,比如“验证码错误”、“验证码已过期”等,所以我们定义一个验证码类型的异常类:
1 2 3 4 5 6 7 8 9 public class ValidateCodeException extends AuthenticationException { private static final long serialVersionUID = 5022575393500654458L; public ValidateCodeException(String msg) { super(msg); } }
注意:这里继承的是AuthenticationException而不是Exception。
4.2 验证码校验过滤器 我们都知道,Spring Security实际上是由许多过滤器组成的过滤器链,处理用户登录逻辑的过滤器为UsernamePasswordAuthenticationFilter,而验证码校验过程应该是在这个过滤器之前的,即只有验证码校验通过后采去校验用户名和密码。由于Spring Security并没有直接提供验证码校验相关的过滤器接口,所以我们需要自己定义一个验证码校验的过滤器ValidateCodeFilter:
1 2 3 4 5 6 7 8 9 10 11 12 13 14 15 16 17 18 19 20 21 22 23 24 25 26 27 28 29 30 31 32 33 34 35 36 37 38 39 40 41 42 43 44 45 46 47 48 49 50 51 52 @Component @Slf4j public class ValidateCodeFilter extends OncePerRequestFilter { @Autowired private AuthenticationFailureHandler authenticationFailureHandler; @Override protected void doFilterInternal(HttpServletRequest request, HttpServletResponse response, FilterChain filterChain) throws ServletException, IOException { if(request.getRequestURI().equals("/login")&&request.getMethod().equalsIgnoreCase("post")){ try { validate(request); } catch (ValidateCodeException e) { authenticationFailureHandler.onAuthenticationFailure(request,response,e); return; } } // 3. 校验通过,就放行 filterChain.doFilter(request, response); } /* 验证保存在session的验证码和表单提交的验证码是否一致 */ private void validate(HttpServletRequest request) throws ServletRequestBindingException { String captcha = ServletRequestUtils.getStringParameter(request, "imageCode"); String code = (String) request.getSession().getAttribute(Constants.KAPTCHA_SESSION_KEY); ImageCode codeInSession = (ImageCode) request.getSession().getAttribute("imageCodeObj"); log.info("获取提交的code:{}",captcha); log.info("获取保存的code:{}",code); if (StringUtils.isBlank(captcha)) { throw new ValidateCodeException("验证码不能为空!"); } if (codeInSession == null) { throw new ValidateCodeException("验证码不存在!"); } if (codeInSession.isExpire()) { request.getSession().removeAttribute(request.getParameter("imageCodeObj")); throw new ValidateCodeException("验证码已过期!"); } if(!code.equalsIgnoreCase(captcha)){ throw new ValidateCodeException("验证码不正确!"); } request.getSession().removeAttribute(request.getParameter("imageCodeObj")); request.getSession().removeAttribute(request.getParameter(Constants.KAPTCHA_SESSION_KEY)); } }
ValidateCodeFilter继承了org.springframework.web.filter.OncePerRequestFilter,该过滤器只会执行一次。
在doFilterInternal方法中我们判断了请求URL是否为/login,该路径对应登录form表单的action路径,请求的方法是否为POST,是的话进行验证码校验逻辑,否则直接执行filterChain.doFilter让代码往下走。当在验证码校验的过程中捕获到异常时,调用Spring Security的校验失败处理器AuthenticationFailureHandler进行处理。
4.3 配置改造 验证码校验过滤器定义好了,怎么才能将其添加到UsernamePasswordAuthenticationFilter前面呢?很简单,只需要在BrowserSecurityConfig的configure方法中添加些许配置即可:
1 2 3 4 5 6 7 8 9 10 11 12 13 14 15 16 17 18 19 20 21 22 23 24 25 26 27 28 29 30 31 32 33 34 35 36 37 38 39 40 41 42 43 44 45 @Configuration @EnableWebSecurity @EnableGlobalMethodSecurity(prePostEnabled = true) //开启security注解 public class BrowserSecurityConfig extends WebSecurityConfigurerAdapter { @Autowired private MyAuthenticationSucessHandler authenticationSucessHandler; @Autowired private MyAuthenticationFailureHandler authenticationFailureHandler; @Autowired private ValidateCodeFilter validateCodeFilter; @Bean public PasswordEncoder passwordEncoder() { return new BCryptPasswordEncoder(); } @Override protected void configure(HttpSecurity http) throws Exception { http.addFilterBefore(validateCodeFilter, UsernamePasswordAuthenticationFilter.class) // 添加验证码校验过滤器 .formLogin() // 表单登录 // http.httpBasic() // HTTP Basic //.loginPage("/login.html") .loginPage("/authentication/require") // 登录跳转 URL .loginProcessingUrl("/login") .successHandler(authenticationSucessHandler) // 处理登录成功 .failureHandler(authenticationFailureHandler) // 处理登录失败 .and() .authorizeRequests() // 授权配置 //.antMatchers("/login.html").permitAll() .antMatchers("/authentication/require", "/login.html", "/code/image").permitAll() // 登录跳转 URL 无需认证 .anyRequest() // 所有请求 .authenticated() // 都需要认证 .and().csrf().disable(); } @Override public void configure(WebSecurity web) throws Exception { //解决静态资源被拦截的问题 web.ignoring().antMatchers("/css/**"); } }
上面代码中,我们注入了ValidateCodeFilter,然后通过addFilterBefore方法将ValidateCodeFilter验证码校验过滤器添加到了UsernamePasswordAuthenticationFilter前面。
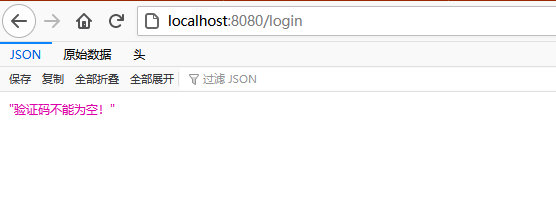
4.4 测试 大功告成,重启项目,访问 http://localhost:8080/login.html ,当不输入验证码时点击登录,页面显示如下:
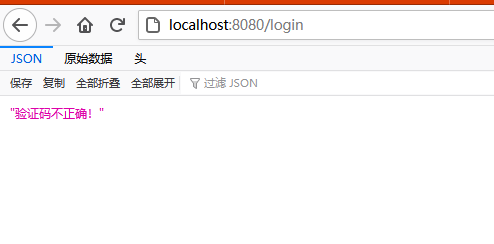
当输入错误的验证码时点击登录,页面显示如下:
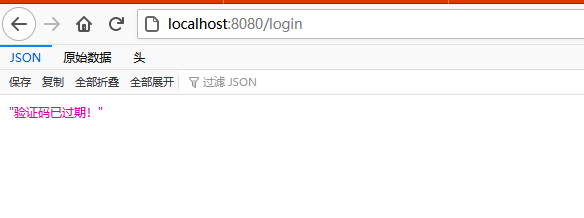
当页面加载60秒后再输入验证码点击登录,页面显示如下:
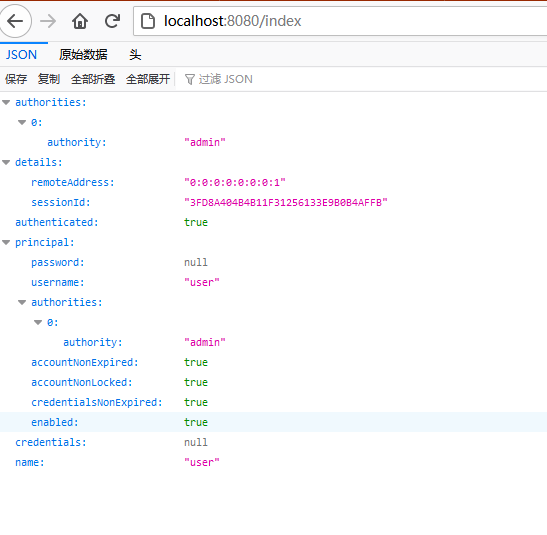
当验证码通过,并且用户名密码正确时,页面显示如下: