一、前言 Spring MVC Web架构是基于阻塞式Servlet API构建的。Servlet 3.1后提供了非阻塞API,Spring 5.0后基于这些API构建了一套全新的非阻塞Web框架 —— WebFlux。Spring Boot 2.0基于Spring 5.0构建,所以要在Spring Boot中使用WebFlux架构,版本必须大于2.0。
通过下面这张图了解下Spring MVC和Spring WebFlux的区别:
可以看到,Spring WebFlux是非阻塞式的,支持 Reactive Streams背压,并在Netty,Undertow和Servlet 3.1+容器等服务器上运行。其目前只支持非关系型数据库,如Mongo,Redis等。非阻塞式的编程模型可以提高程序的并发量,提升性能和吞吐量。
二、异步Servlet 既然WebFlux是基于异步Servelt API构建的,那么我们先来看看什么是异步Servlet。https://www.cnblogs.com/javabg/p/7976977.html ),我们这里直接在springboot项目里创建servlet,具体可参考 《Spring Boot中使用Servlet》 。
2.1 SyncServlet 创建一个SyncServlet:
1
2
3
4
5
6
7
8
9
10
11
12
13
14
15
16
17
18
19
20
21
22
23
24
25
26
@Slf4j @WebServlet(urlPatterns = "/sync") public class SyncServlet extends HttpServlet { @Override protected void doGet(HttpServletRequest request, HttpServletResponse response) { long start = System.currentTimeMillis(); this.execute(request, response); log.info("总耗时:" + (System.currentTimeMillis() - start) + "ms"); } private void execute(HttpServletRequest request, HttpServletResponse response) { try { TimeUnit.SECONDS.sleep(2); } catch (InterruptedException e) { e.printStackTrace(); } try { response.getWriter().append("hello"); } catch (IOException e) { e.printStackTrace(); } } }
doGet方法中线程阻塞2秒,然后打印hello。部署项目到Tomcat,context-path为/servlet,启动后使用http工具访问 http://localhost:8080/sync :
传统的Servlet API是阻塞的,log.info("总耗时:" + (System.currentTimeMillis() - start) + "ms")这行代码必须等待this.execute()执行完毕后才开始执行。
2.2 AsyncServlet 接下来看看非阻塞Servlet API是怎么搞的。新建一个AsyncServlet:
1
2
3
4
5
6
7
8
9
10
11
12
13
14
15
16
17
18
19
20
21
22
23
24
25
26
27
28
29
30
31
32
@Slf4j @WebServlet(urlPatterns = "/async", asyncSupported = true) public class AsyncServlet extends HttpServlet { @Override protected void doGet(HttpServletRequest request, HttpServletResponse response) { long start = System.currentTimeMillis(); AsyncContext asyncContext = request.startAsync(); CompletableFuture.runAsync(() -> execute( asyncContext, asyncContext.getRequest(), asyncContext.getResponse()) ); log.info("总耗时:" + (System.currentTimeMillis() - start) + "ms"); } private void execute(AsyncContext asyncContext, ServletRequest request, ServletResponse response) { try { TimeUnit.SECONDS.sleep(2); } catch (InterruptedException e) { e.printStackTrace(); } try { response.getWriter().append("hello"); } catch (IOException e) { e.printStackTrace(); } asyncContext.complete(); } }
在类上使用@WebServlet(asyncSupported = true)开启异步支持,通过AsyncContext asyncContext = request.startAsync();获取异步上下文AsyncContext,AsyncContext的complete方法用于标识异步调用结束。CompletableFuture为Java 8提供的Future接口实现类,可以方便的处理异步调用。
启动项目,访问 http://localhost:8080/async ,响应耗时也在2秒左右,但是这个过程是异步的,查看控制台日志就可以证明这点:
所以,异步调用适用于那些对方法返回值没有影响的操作,比如异步记录用户操作日志等。如果方法的返回值依赖于异步调用的结果,那么方法耗时在同步和异步上是没有区别的。
三、Mono和Flux 3.1 Mono和Flux 测试 了解了异步Servlet后,我们回到WebFlux,在上面项目引入spring-boot-starter-webflux依赖
1
2
3
4
<dependency> <groupId>org.springframework.boot</groupId> <artifactId>spring-boot-starter-webflux</artifactId> </dependency>
Reactor 是Spring WebFlux所使用的响应式库,其提供了两个特殊的类Mono和Flux。
Mono和Flux在发布订阅模式中都属于发布者,查看源码会发现它们都实现了Publisher接口。
Mono表示0 ~ 1个元素的数据发布者,Flux表示 0 ~ N个元素的数据发布者。我们可以通过一个例子来了解Mono和Flux,创建MonoFluxTest类:
1
2
3
4
5
6
7
8
9
10
11
12
13
14
15
16
17
18
19
20
21
22
23
24
25
26
27
28
29
30
31
32
33
34
35
36
37
38
39
40
41
42
public class MonoFluxTest { public static void main(String[] args) { Subscriber<Integer> subscriber = new Subscriber<Integer>() { private Subscription subscription; @Override public void onSubscribe(Subscription subscription) { this.subscription = subscription; this.subscription.request(1); } @Override public void onNext(Integer item) { System.out.println("接受到数据: " + item); try { TimeUnit.SECONDS.sleep(3); } catch (InterruptedException e) { e.printStackTrace(); } this.subscription.request(1); } @Override public void onError(Throwable throwable) { throwable.printStackTrace(); this.subscription.cancel(); } @Override public void onComplete() { System.out.println("处理完了!"); } }; String[] strs = {"1", "2", "3"}; Flux.fromArray(strs).map(Integer::parseInt).subscribe(subscriber); Mono.fromSupplier(() -> 1).map(s -> s + 1).subscribe(subscriber); } }
程序首先创建了一个订阅者,然后分别使用Flux.fromArray和Mono.fromSupplier构造了Flux类型发布者和Mono类型发布者,并和订阅者保持订阅关系。
运行main方法,控制台输出:
接受到数据: 1
3.2 TestController: 了解了Mono和Flux后,我们新建一个TestController:
1
2
3
4
5
6
7
8
9
10
11
12
13
14
15
16
17
18
19
20
21
22
23
24
25
26
27
28
29
30
@RestController @Slf4j public class TestController { @GetMapping("test/sync") public String sync() { log.info("sync method start"); String result = this.execute(); log.info("sync method end"); return result; } @GetMapping("test/asyncMono") public Mono<String> asyncMono() { log.info("async method start"); Mono<String> result = Mono.fromSupplier(this::execute); log.info("async method end"); return result; } private String execute() { try { TimeUnit.SECONDS.sleep(2); } catch (InterruptedException e) { e.printStackTrace(); } return "hello"; } }
execute方法返回一个值hello,所以可以使用Mono来处理返回值,使它成为一个异步方法。asyncMono方法返回Mono类型,也就是一个String类型的数据发布者,我们不用去手动处理订阅关系,Spring会帮我们处理,我们直接返回即可。
启动项目,访问 http://localhost:8080/test/sync
访问 http://localhost:8080/test/asyncMono
可以看到asyncMono方法里的Mono result = Mono.fromSupplier(this::execute)是异步非阻塞的,并且 http://localhost:8080/test/asyncMono 返回的值为字符串hello。
四、Server Sent Events 返回值类型为Flux的时候,它是一个数据流,不是一次性数据包,服务端会不断地(假如Flux数据长度大于1)往客户端发送数据。这时,客户端不会关闭连接,会一直等着服务器发过来的新的数据流。这种模式称为Server-Sent Events。
在TestController新增一个asyncFlux方法:
1
2
3
4
5
6
7
8
9
10
11
12
13
14
@GetMapping(value = "test/flux", produces = MediaType.TEXT_EVENT_STREAM_VALUE) public Flux<String> asyncFlux() { log.info("async method start"); Flux<String> result = Flux.fromStream(IntStream.range(1, 5).mapToObj(i -> { try { TimeUnit.SECONDS.sleep(1); } catch (InterruptedException e) { e.printStackTrace(); } return "int value: " + i; })); log.info("async method end"); return result; }
@GetMapping必须通过produces指定数据类型为text/event-stream,重启项目,访问 http://localhost:8080/test/flux
前端可以通过H5的EventSource来接收。
1
2
3
4
<dependency> <groupId>org.springframework.boot</groupId> <artifactId>spring-boot-starter-thymeleaf</artifactId> </dependency>
然后在resources/templates下新建flux.html:
1
2
3
4
5
6
7
8
9
10
11
12
13
14
15
16
17
18
<!DOCTYPE html> <html lang="en"> <head> <meta charset="UTF-8"> <title>test sse</title> </head> <body> </body> <script> var es = new EventSource("test/flux"); es.onmessage = function (evt) { console.log(evt.data); if (evt.data === "int value: 4") { es.close(); } }; </script> </html>
需要调用es.close()来关闭事件流,不然EventSource会在数据传输完毕会自动重连,这样就会不间断的调用 localhost:8080/test/flux 请求了。
添加一个ViewController,用来访问flux.html:
1
2
3
4
5
6
7
8
@Controller public class ViewController { @GetMapping("flux") public String flux() { return "flux"; } }
重启项目,访问 http://localhost:8080/flux ,浏览器控制台输出如下所示:
五、Mono,Flux常用方法 通过上面的例子,我们简单了解了Mono和Flux的用法和区别,下面我们列举一些它们的常用方法。
5.1 源头操作 5.1.1 Flux 可以通过Flux类的静态方法来生成:
举些例子:
1
2
3
4
5
6
7
8
9
public static void main(String[] args) throws InterruptedException { Flux.just("Hello", "World").subscribe(System.out::println); Flux.fromArray(new Integer[] {1, 2, 3}).subscribe(System.out::println); Flux.empty().subscribe(System.out::println); Flux.range(1, 4).subscribe(System.out::println); Flux.interval(Duration.of(1, ChronoUnit.SECONDS)).subscribe(System.out::println); // 线程延迟关闭,不然最后一个例子木有输出 Thread.currentThread().join(10000); }
上面的这些静态方法适合于简单的Flux序列生成,当序列的生成需要复杂的逻辑时,则应该使用generate()或create()方法。
generate()
generate()方法通过同步和逐一的方式来产生 Flux 序列。序列的产生是通过调用所提供的 SynchronousSink 对象的 next(),complete()和 error(Throwable)方法来完成的:
1
2
3
4
5
6
7
8
9
10
11
12
13
14
15
16
17
18
public static void main(String[] args) throws InterruptedException { Flux.generate(sink -> { sink.next("Hello"); sink.complete(); }).subscribe(System.out::println); final Random random = new Random(); Flux.generate(ArrayList::new, (list, sink) -> { int value = random.nextInt(100); list.add(value); sink.next(value); if (list.size() == 10) { sink.complete(); } return list; }).subscribe(System.out::println); }
输出如下所示:
如果不调用 complete()方法,所产生的是一个无限序列。
create()
create()方法与 generate()方法的不同之处在于所使用的是 FluxSink 对象。FluxSink 支持同步和异步的消息产生,并且可以在一次调用中产生多个元素:
1
2
3
4
5
6
Flux.create(sink -> { for (int i = 0; i < 10; i++) { sink.next(i); } sink.complete(); }).subscribe(System.out::println);
5.1.2 Mono Mono 的创建方式与之前介绍的 Flux 比较相似。Mono 类中也包含了一些与 Flux 类中相同的静态方法。这些方法包括 just(),empty(),error()和 never()等。除了这些方法之外,Mono 还有一些独有的静态方法:
fromCallable()、fromCompletionStage()、fromFuture()、fromRunnable()和 fromSupplier():分别从 Callable、CompletionStage、CompletableFuture、Runnable 和 Supplier 中创建 Mono。 source):创建一个 Mono 序列,忽略作为源的 Publisher 中的所有元素,只产生结束消息。
justOrEmpty(Optional<? extends T> data)和 justOrEmpty(T data):从一个 Optional 对象或可能为 null 的对象中创建 Mono。只有 Optional 对象中包含值或对象不为 null 时,Mono 序列才产生对应的元素。
举些例子:
1
2
3
4
5
6
public static void main(String[] args){ Mono.just("are").subscribe(System.out::println); Mono.empty().subscribe(System.out::println); Mono.fromSupplier(() -> "you").subscribe(System.out::println); Mono.justOrEmpty(Optional.of("ok")).subscribe(System.out::println); }
输出:
are
5.2 中间操作 5.2.1 filter 对流中包含的元素进行过滤,只留下满足 Predicate 指定条件的元素:
1 Flux.range(1, 10).filter(i -> i % 2 == 0).subscribe(System.out::println);
5.2.2 take take 系列操作符用来从当前流中提取元素。提取的方式可以有很多种。
1.take(long n):按照指定的数量来提取。
举些例子:
1
2
3
4
Flux.range(1, 20).take(10).subscribe(System.out::println); Flux.range(1, 20).takeLast(10).subscribe(System.out::println); Flux.range(1, 20).takeWhile(i -> i < 10).subscribe(System.out::println); Flux.range(1, 20).takeUntil(i -> i == 10).subscribe(System.out::println);
5.2.3 reduce 和 reduceWith reduce 和 reduceWith 操作符对流中包含的所有元素进行累积操作,得到一个包含计算结果的 Mono 序列。累积操作是通过一个 BiFunction 来表示的。在操作时可以指定一个初始值。如果没有初始值,则序列的第一个元素作为初始值。
比如:
1
2
Flux.range(1, 10).reduce((x, y) -> x + y).subscribe(System.out::println); Flux.range(1, 10).reduceWith(() -> 10, (x, y) -> x + y).subscribe(System.out::println);
第一行语句对流中的元素进行相加操作,结果为 55;第二行语句同样也是进行相加操作,不过通过一个 Supplier 给出了初始值为 10,所以结果为 65。
5.2.4 merge merge操作符用来把多个流合并成一个 Flux 序列:
1
2
3
4
Flux.merge( Flux.interval(Duration.of(500, ChronoUnit.MILLIS)).take(2), Flux.interval(Duration.of(500, ChronoUnit.MILLIS)).take(2) ).toStream().forEach(System.out::println);
输出
0 0 1 1
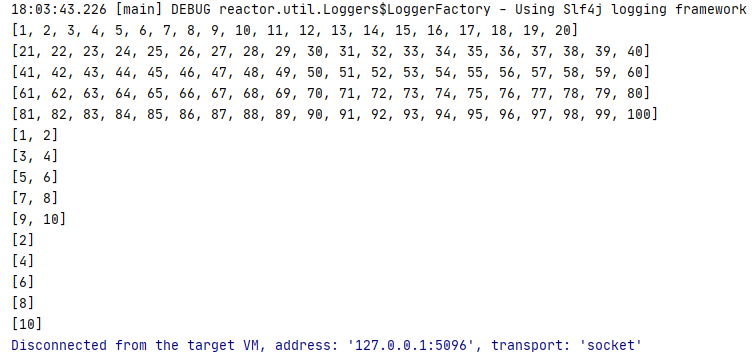
5.2.5 buffer 直接看例子吧:
1
2
3
Flux.range(1, 100).buffer(20).subscribe(System.out::println); Flux.range(1, 10).bufferUntil(i -> i % 2 == 0).subscribe(System.out::println); Flux.range(1, 10).bufferWhile(i -> i % 2 == 0).subscribe(System.out::println);
输出如下所示:
类似于数据流分区。
5.2.6 zipWith 将两个流的元素安装元素位置一一组合:
1
2
3
Flux.just("a", "b", "c", "d") .zipWith(Flux.just("e", "f", "g", "h", "i")) .subscribe(System.out::println);
输出:
[a,e]
没有配对上的被丢弃。
另外一个例子:
1
2
3
Flux.just("a", "b", "c", "d") .zipWith(Flux.just("e", "f", "g", "h", "i"), (s1, s2) -> String.format("%s-%s", s1, s2)) .subscribe(System.out::println);
a-e
5.2.7 flatMap 把流中的每个元素转换成一个流,再把所有流中的元素进行合并。
比如:
1
2
3
Flux.just(5, 10).flatMap( x -> Flux.range(1, x).take(x) ).subscribe(System.out::println);
5.3 终端处理 通过subscribe()方法处理正常和错误消息:
1
2
3
Flux.just(1, 2) .concatWith(Mono.error(new IllegalStateException())) .subscribe(System.out::println, System.err::println);
输出:
1
出现错误时返回默认值:
1
2
3
4
Flux.just(1, 2) .concatWith(Mono.error(new IllegalStateException())) .onErrorReturn(0) .subscribe(System.out::println);
输出:
1
出现错误时使用另外的流:
1
2
3
4
5
6
7
8
9
10
Flux.just(1, 2) .concatWith(Mono.error(new IllegalArgumentException())) .onErrorResume(e -> { if (e instanceof IllegalStateException) { return Mono.just(0); } else if (e instanceof IllegalArgumentException) { return Mono.just(-1); } return Mono.empty(); }).subscribe(System.out::println);
输出如下:
1