一、引入依赖 1 2 3 4 5 6 7 8 9 10 11 12 13 14 15 16 17 18 19 20 21 22 23 24 25 <dependency> <groupId>com.oracle</groupId> <artifactId>ojdbc6</artifactId> <version>6.0</version> </dependency> <dependency> <groupId>mysql</groupId> <artifactId>mysql-connector-java</artifactId> <scope>runtime</scope> </dependency> <dependency> <groupId>org.mybatis.spring.boot</groupId> <artifactId>mybatis-spring-boot-starter</artifactId> <version>2.1.1</version> </dependency> <dependency> <groupId>com.alibaba</groupId> <artifactId>druid-spring-boot-starter</artifactId> <version>1.1.22</version> </dependency> <dependency> <groupId>org.projectlombok</groupId> <artifactId>lombok</artifactId> <optional>true</optional> </dependency>
二、多数据源配置 在Spring Boot配置文件application.yml中配置多数据源和Spring Boot JdbcTemplate配置Druid多数据源一致。
1 2 3 4 5 6 7 8 9 10 11 12 13 14 15 16 17 18 19 20 21 22 23 24 25 26 27 28 29 30 31 32 33 34 @Configuration @MapperScan(basePackages = MysqlDatasourceConfig.PACKAGE, sqlSessionFactoryRef = "mysqlSqlSessionFactory") public class MysqlDatasourceConfig { // mysqldao扫描路径 static final String PACKAGE = "com.wno704.boot.mysqldao"; // mybatis mapper扫描路径 static final String MAPPER_LOCATION = "classpath:mapper/mysql/*.xml"; @Primary @Bean(name = "mysqldatasource") @ConfigurationProperties("spring.datasource.druid.mysql") public DataSource mysqlDataSource() { return DruidDataSourceBuilder.create().build(); } @Bean(name = "mysqlTransactionManager") @Primary public DataSourceTransactionManager mysqlTransactionManager() { return new DataSourceTransactionManager(mysqlDataSource()); } @Bean(name = "mysqlSqlSessionFactory") @Primary public SqlSessionFactory mysqlSqlSessionFactory(@Qualifier("mysqldatasource") DataSource dataSource) throws Exception { final SqlSessionFactoryBean sessionFactory = new SqlSessionFactoryBean(); sessionFactory.setDataSource(dataSource); //如果不使用xml的方式配置mapper,则可以省去下面这行mapper location的配置。 sessionFactory.setMapperLocations(new PathMatchingResourcePatternResolver() .getResources(MysqlDatasourceConfig.MAPPER_LOCATION)); return sessionFactory.getObject(); } }
上面代码配置了一个名为mysqldatasource的数据源,对应application.yml中spring.datasource.druid.mysql前缀配置的数据库。然后创建了一个名为mysqlSqlSessionFactory的Bean,并且注入了mysqldatasource。与此同时,还分别定了两个扫描路径PACKAGE和MAPPER_LOCATION,前者为Mysql数据库对应的mapper接口地址,后者为对应的mapper xml文件路径。
OracleDatasourceConfig:
1 2 3 4 5 6 7 8 9 10 11 12 13 14 15 16 17 18 19 20 21 22 23 24 25 26 27 28 29 30 31 @Configuration @MapperScan(basePackages = OracleDatasourceConfig.PACKAGE, sqlSessionFactoryRef = "oracleSqlSessionFactory") public class OracleDatasourceConfig { // oracledao扫描路径 static final String PACKAGE = "com.wno704.boot.oracledao"; // mybatis mapper扫描路径 static final String MAPPER_LOCATION = "classpath:mapper/oracle/*.xml"; @Bean(name = "oracledatasource") @ConfigurationProperties("spring.datasource.druid.oracle") public DataSource oracleDataSource() { return DruidDataSourceBuilder.create().build(); } @Bean(name = "oracleTransactionManager") public DataSourceTransactionManager oracleTransactionManager() { return new DataSourceTransactionManager(oracleDataSource()); } @Bean(name = "oracleSqlSessionFactory") public SqlSessionFactory oracleSqlSessionFactory(@Qualifier("oracledatasource") DataSource dataSource) throws Exception { final SqlSessionFactoryBean sessionFactory = new SqlSessionFactoryBean(); sessionFactory.setDataSource(dataSource); //如果不使用xml的方式配置mapper,则可以省去下面这行mapper location的配置。 sessionFactory.setMapperLocations(new PathMatchingResourcePatternResolver() .getResources(OracleDatasourceConfig.MAPPER_LOCATION)); return sessionFactory.getObject(); } }
具体的application.yml配置如下:
1 2 3 4 5 6 7 8 9 10 11 12 13 14 15 16 17 18 19 20 21 22 23 24 25 26 27 28 29 30 31 32 33 34 35 36 37 38 39 40 41 42 43 44 45 46 47 48 49 50 51 52 53 54 55 56 57 58 59 60 61 62 63 64 65 66 67 spring: datasource: druid: # 数据库访问配置, 使用druid数据源 mysql: type: com.alibaba.druid.pool.DruidDataSource driver-class-name: com.mysql.cj.jdbc.Driver url: jdbc:mysql://127.0.0.1:3306/springboot?useUnicode=true&characterEncoding=utf8&serverTimezone=UTC&allowMultiQueries=true&useSSL=false username: spring password: spring#123 oracle: type: com.alibaba.druid.pool.DruidDataSource driver-class-name: oracle.jdbc.driver.OracleDriver url: jdbc:oracle:thin:@125.72.228.21:1521:qhfwbzdb username: wno704 password: wno704db312 # 连接池配置 initial-size: 5 min-idle: 5 max-active: 20 # 连接等待超时时间 max-wait: 30000 # 配置检测可以关闭的空闲连接间隔时间 time-between-eviction-runs-millis: 60000 # 配置连接在池中的最小生存时间 min-evictable-idle-time-millis: 300000 validation-query: select '1' from dual test-while-idle: true test-on-borrow: false test-on-return: false # 打开PSCache,并且指定每个连接上PSCache的大小 pool-prepared-statements: true max-open-prepared-statements: 20 max-pool-prepared-statement-per-connection-size: 20 # 配置监控统计拦截的filters, 去掉后监控界面sql无法统计, 'wall'用于防火墙 filters: stat,wall # Spring监控AOP切入点,如x.y.z.service.*,配置多个英文逗号分隔 aop-patterns: com.springboot.service.* # WebStatFilter配置 web-stat-filter: enabled: true # 添加过滤规则 url-pattern: /* # 忽略过滤的格式 exclusions: '*.js,*.gif,*.jpg,*.png,*.css,*.ico,/druid/*' # StatViewServlet配置 stat-view-servlet: enabled: true # 访问路径为/druid时,跳转到StatViewServlet url-pattern: /druid/* # 是否能够重置数据 reset-enable: false # 需要账号密码才能访问控制台 login-username: druid login-password: druid123 # IP白名单 # allow: 127.0.0.1 # IP黑名单(共同存在时,deny优先于allow) # deny: 192.168.1.218 # 配置StatFilter filter: stat: log-slow-sql: true
脚本导入:《Spring-Boot整合MyBatis》
oracle脚本导入:
1
2
3
4
5
6
7
8
9
10
11
12
13
14
15
16
17
18
19
20
21
22
23
24
25
CREATE TABLE "WNO704"."STUDENT" ( "SNO" NUMBER NOT NULL, "SNAME" NVARCHAR2(50), "SSEX" NVARCHAR2 (2), CONSTRAINT "PK_STUDENT_SNO" PRIMARY KEY ("SNO") ) tablespace WNO704 PCTFREE 10 initrans 1 maxtrans 255 storage ( INITIAL 768K next 8K minextents 1 MAXEXTENTS unlimited t 8K minextents 1 MAXEXTENTS unlimited ); COMMENT ON COLUMN "WNO704"."STUDENT"."SNO" IS '学号'; COMMENT ON COLUMN "WNO704"."STUDENT"."SNAME" IS '姓名'; COMMENT ON COLUMN "WNO704"."STUDENT"."SSEX" IS '性别'; INSERT INTO "STUDENT" VALUES (1, 'KangKang', 'M'); INSERT INTO "STUDENT" VALUES (2, 'Mike', 'M'); INSERT INTO "STUDENT" VALUES (3, 'Jane', 'F');
三、编码 配置完多数据源,接下来分别在com.springboot.mysqldao路径和com.springboot.oracledao路径下创建两个mapper接口:
MysqlStudentMapper:
1
2
3
4
5
@Mapper @Repository("mysqlStudentMapper") public interface MysqlStudentMapper { List<Map<String, Object>> getAllStudents(); }
OracleStudentMapper:
1
2
3
4
5
@Mapper @Repository("oracleStudentMapper") public interface OracleStudentMapper { List<Map<String, Object>> getAllStudents(); }
接着创建mapper接口对应的实现:
在src/main/resource/mapper/mysql/路径下创建MysqlStudentMapper.xml:
1
2
3
4
5
6
7
8
<?xml version="1.0" encoding="UTF-8" ?> <!DOCTYPE mapper PUBLIC "-//mybatis.org//DTD Mapper 3.0//EN" "http://mybatis.org/dtd/mybatis-3-mapper.dtd"> <mapper namespace="com.wno704.boot.mysqldao.MysqlStudentMapper"> <select id="getAllStudents" resultType="java.util.Map"> select * from student </select> </mapper>
在src/main/resource/mapper/oracle/路径下创建OracleStudentMapper.xml:
1
2
3
4
5
6
7
8
<?xml version="1.0" encoding="UTF-8" ?> <!DOCTYPE mapper PUBLIC "-//mybatis.org//DTD Mapper 3.0//EN" "http://mybatis.org/dtd/mybatis-3-mapper.dtd"> <mapper namespace="com.wno704.boot.oracledao.OracleStudentMapper"> <select id="getAllStudents" resultType="java.util.Map"> select * from student </select> </mapper>
编写StudentService:
1
2
3
4
public interface StudentService { List<Map<String, Object>> getAllStudentsWithMysql(); List<Map<String, Object>> getAllStudentsWithOracle(); }
编写实现类StudentServiceImpl:
1
2
3
4
5
6
7
8
9
10
11
12
13
14
15
16
17
18
@Service("studentService") public class StudentServiceImpl implements StudentService { @Autowired private MysqlStudentMapper mysqlStudentMapper; @Autowired private OracleStudentMapper oracleStudentMapper; @Override public List<Map<String, Object>> getAllStudentsWithMysql() { return this.mysqlStudentMapper.getAllStudents(); } @Override public List<Map<String, Object>> getAllStudentsWithOracle() { return this.oracleStudentMapper.getAllStudents(); } }
四、测试 编写controller测试:
1
2
3
4
5
6
7
8
9
10
11
12
13
14
15
@RestController public class TestController { @Autowired private StudentService studentService; @RequestMapping( value = "/getAllStudentsWithMysql", method = RequestMethod.GET) public List<Map<String, Object>> getAllStudentsWithMysql() { return this.studentService.getAllStudentsWithMysql(); } @RequestMapping( value = "/getAllStudentsWithOracle", method = RequestMethod.GET) public List<Map<String, Object>> getAllStudentsWithOracle() { return this.studentService.getAllStudentsWithOracle(); } }
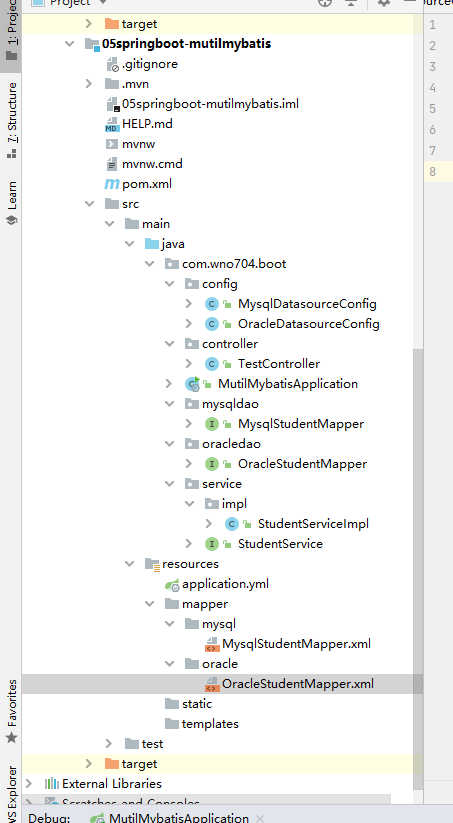
最终项目目录如下图所示:
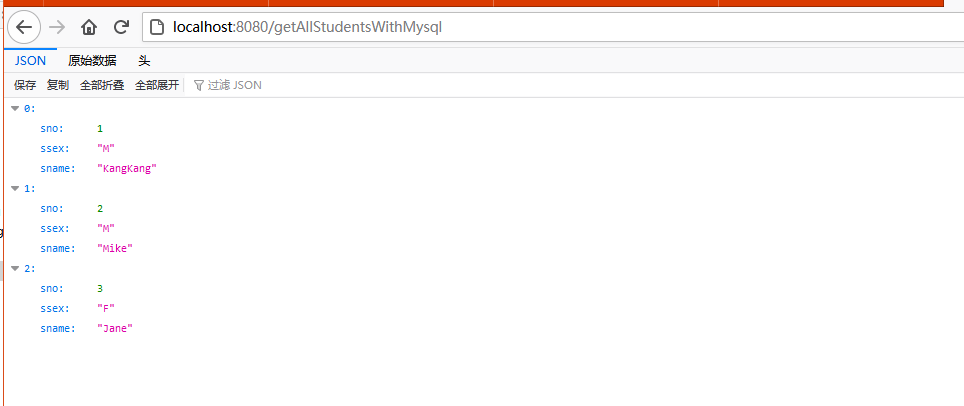
启动项目,访问: http://localhost:8080/getAllStudentsWithMysql
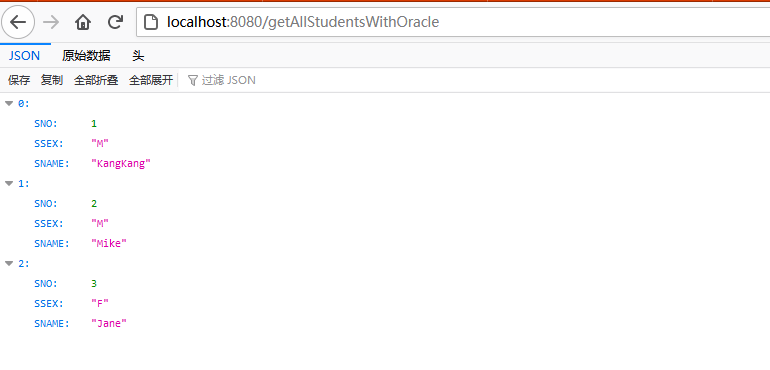
http://localhost:8080/getAllStudentsWithOracle