一、前言

整合MyBatis之前,先搭建一个基本的Spring Boot项目开启Spring Boot。然后引入mybatis-spring-boot-starter和数据库连接驱动(这里使用关系型数据库mysql5.7.30)。

二、mybatis-spring-boot-starter

在pom中引入:

1
2
3
4
5
<dependency>
<groupId>org.mybatis.spring.boot</groupId>
<artifactId>mybatis-spring-boot-starter</artifactId>
<version>2.1.1</version>
</dependency>

不同版本的Spring Boot和MyBatis版本对应不一样,具体可查看官方文档: http://www.mybatis.org/spring-boot-starter/mybatis-spring-boot-autoconfigure/

三、引入mysql

在pom中引入mysql驱动:

1
2
3
4
5
<dependency>
<groupId>mysql</groupId>
<artifactId>mysql-connector-java</artifactId>
<scope>runtime</scope>
</dependency>

四、Druid数据源

Druid是一个关系型数据库连接池,是阿里巴巴的一个开源项目,地址: https://github.com/alibaba/druid 。Druid不但提供连接池的功能,还提供监控功能,可以实时查看数据库连接池和SQL查询的工作情况。

4.1 配置Druid依赖

Druid为Spring Boot项目提供了对应的starter:

1
2
3
4
5
<dependency>
<groupId>com.alibaba</groupId>
<artifactId>druid-spring-boot-starter</artifactId>
<version>1.1.22</version>
</dependency>

4.2 Druid数据源配置

上面通过查看mybatis starter的隐性依赖发现,Spring Boot的数据源配置的默认类型是org.apache.tomcat.jdbc.pool.Datasource,为了使用Druid连接池,需要在application.yml下配置:

1
2
3
4
5
6
7
8
9
10
11
12
13
14
15
16
17
18
19
20
21
22
23
24
25
26
27
28
29
30
31
32
33
34
35
36
37
38
39
40
41
42
43
44
45
46
47
48
49
50
51
52
53
54
55
56
57
58
59
60
spring:
datasource:
druid:
# 数据库访问配置, 使用druid数据源
type: com.alibaba.druid.pool.DruidDataSource
driver-class-name: com.mysql.cj.jdbc.Driver
url: jdbc:mysql://192.168.2.117:3306/springboot?useUnicode=true&characterEncoding=utf8&serverTimezone=UTC&allowMultiQueries=true&useSSL=false
username: spring
password: spring#123
# 连接池配置
initial-size: 5
min-idle: 5
max-active: 20
# 连接等待超时时间
max-wait: 30000
# 配置检测可以关闭的空闲连接间隔时间
time-between-eviction-runs-millis: 60000
# 配置连接在池中的最小生存时间
min-evictable-idle-time-millis: 300000
validation-query: select '1' from dual
test-while-idle: true
test-on-borrow: false
test-on-return: false
# 打开PSCache,并且指定每个连接上PSCache的大小
pool-prepared-statements: true
max-open-prepared-statements: 20
max-pool-prepared-statement-per-connection-size: 20
# 配置监控统计拦截的filters, 去掉后监控界面sql无法统计, 'wall'用于防火墙
filters: stat,wall
# Spring监控AOP切入点,如x.y.z.service.*,配置多个英文逗号分隔
aop-patterns: com.springboot.servie.*


# WebStatFilter配置
web-stat-filter:
enabled: true
# 添加过滤规则
url-pattern: /*
# 忽略过滤的格式
exclusions: '*.js,*.gif,*.jpg,*.png,*.css,*.ico,/druid/*'

# StatViewServlet配置
stat-view-servlet:
enabled: true
# 访问路径为/druid时,跳转到StatViewServlet
url-pattern: /druid/*
# 是否能够重置数据
reset-enable: false
# 需要账号密码才能访问控制台
login-username: druid
login-password: druid123
# IP白名单
# allow: 127.0.0.1
# IP黑名单(共同存在时,deny优先于allow)
# deny: 192.168.1.218

# 配置StatFilter
filter:
stat:
log-slow-sql: true

上述配置不但配置了Druid作为连接池,而且还开启了Druid的监控功能。 其他配置可参考官方wiki—— https://github.com/alibaba/druid/tree/master/druid-spring-boot-starter

此时,运行项目,访问 http://localhost:8080/druid

输入账号密码即可看到Druid监控后台:

关于Druid的更多说明,可查看官方wiki—— https://github.com/alibaba/druid/wiki/%E5%B8%B8%E8%A7%81%E9%97%AE%E9%A2%98

五、使用MyBatis

5.1 创建库表:

1
2
3
4
5
6
7
8
9
10
11
12
13
14
15
16
17
18
create database springboot default character set utf8 collate utf8_general_ci;
create user 'spring'@'%' identified by 'spring#123';
create user 'spring'@'localhost' identified by 'spring#123';
grant all privileges on springboot.* to 'spring'@'%' identified by 'spring#123';
grant all privileges on springboot.* to 'spring'@'localhost' identified by 'spring#123';
flush privileges;

drop table if exists `student`;
create table `student` (
`sno` int(11) not null auto_increment comment '学号',
`sname` varchar(50) character set utf8 collate utf8_general_ci not null comment '姓名',
`ssex` varchar(2) character set utf8 collate utf8_general_ci not null comment '性别',
primary key (`sno`) using btree
) engine = innodb auto_increment = 1 character set = utf8 collate = utf8_general_ci row_format = dynamic;

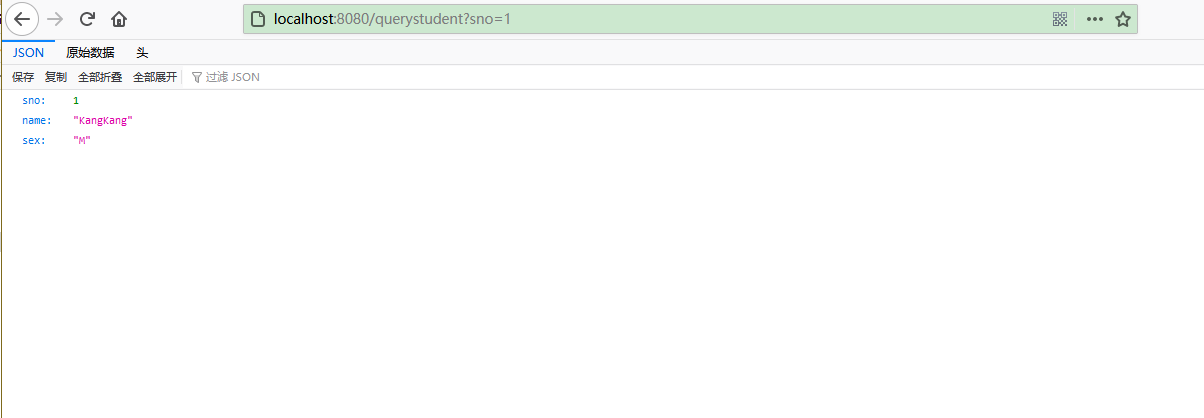
insert into `student` values (1, 'KangKang', 'M');
insert into `student` values (2, 'Mike', 'M');
insert into `student` values (3, 'Jane', 'F');

5.2 创建对应实体:

1
2
3
4
5
6
7
8
@Getter
@Setter
public class Student implements Serializable {
private static final long serialVersionUID = -339516038496531943L;
private int sno;
private String name;
private String sex;
}

创建一个包含基本CRUD的StudentMapper:

1
2
3
4
5
6
7
8
9
10
11
12
@Component
@Mapper
public interface StudentMapper {

int add(Student student);

int update(Student student);

int deleteBysno(int sno);

Student queryStudentBySno(int id);
}

StudentMapper的实现可以基于xml也可以基于注解。

5.3 使用注解方式

继续编辑StudentMapper:

1
2
3
4
5
6
7
8
9
10
11
12
13
14
15
16
17
18
19
20
@Component
@Mapper
public interface StudentMapper {
@Insert("insert into student(sno,sname,ssex) values(#{sno},#{name},#{sex})")
int add(Student student);

@Update("update student set sname=#{name},ssex=#{sex} where sno=#{sno}")
int update(Student student);

@Delete("delete from student where sno=#{sno}")
int deleteBysno(int sno);

@Select("select * from student where sno=#{sno}")
@Results(id = "student",value= {
@Result(property = "sno", column = "sno", javaType = Integer.class),
@Result(property = "name", column = "sname", javaType = String.class),
@Result(property = "sex", column = "ssex", javaType = String.class)
})
Student queryStudentBySno(int id);
}

简单的语句只需要使用@Insert、@Update、@Delete、@Select这4个注解即可,动态SQL语句需要使用@InsertProvider、@UpdateProvider、@DeleteProvider、@SelectProvider等注解。具体可参考MyBatis官方文档: http://www.mybatis.org/mybatis-3/zh/java-api.html

5.4 使用xml方式

使用xml方式需要在application.yml中进行一些额外的配置:

1
2
3
4
5
6
7
mybatis:
# type-aliases扫描路径
# type-aliases-package:
# mapper xml实现扫描路径
mapper-locations: classpath:mapper/*.xml
property:
order: BEFORE

六、测试

接下来编写Service:

1
2
3
4
5
6
public interface StudentService {
int add(Student student);
int update(Student student);
int deleteBysno(int sno);
Student queryStudentBySno(int sno);
}

实现类:

1
2
3
4
5
6
7
8
9
10
11
12
13
14
15
16
17
18
19
20
21
22
23
24
25
26
@Service("studentService")
public class StudentServiceImpl implements StudentService {

@Autowired
private StudentMapper studentMapper;

@Override
public int add(Student student) {
return this.studentMapper.add(student);
}

@Override
public int update(Student student) {
return this.studentMapper.update(student);
}

@Override
public int deleteBysno(int sno) {
return this.studentMapper.deleteBysno(sno);
}

@Override
public Student queryStudentBySno(int sno) {
return this.studentMapper.queryStudentBySno(sno);
}
}

编写controller:

1
2
3
4
5
6
7
8
9
10
@RestController
public class TestController {
@Autowired
private StudentService studentService;

@RequestMapping( value = "/querystudent", method = RequestMethod.GET)
public Student queryStudentBySno(int sno) {
return this.studentService.queryStudentBySno(sno);
}
}

启动项目访问: http://localhost:8080/querystudent?sno=1

查看SQL监控情况:

可看到其记录的就是刚刚访问/querystudent得到的SQL。