一、项目创建
Spring Boot是在Spring框架上创建的一个全新的框架,其设计目的是简化Spring应用的搭建和开发过程。开启Spring Boot有许多种方法可供选择,这里仅介绍使用idea来构建一个简单的Spring Boot项目。
1> 首先创建一个空项目,然后在项目上面鼠标右键选择New->Module,如下图所示:
![]()
2> 接着选择Spring Initializr,点击next
![]()
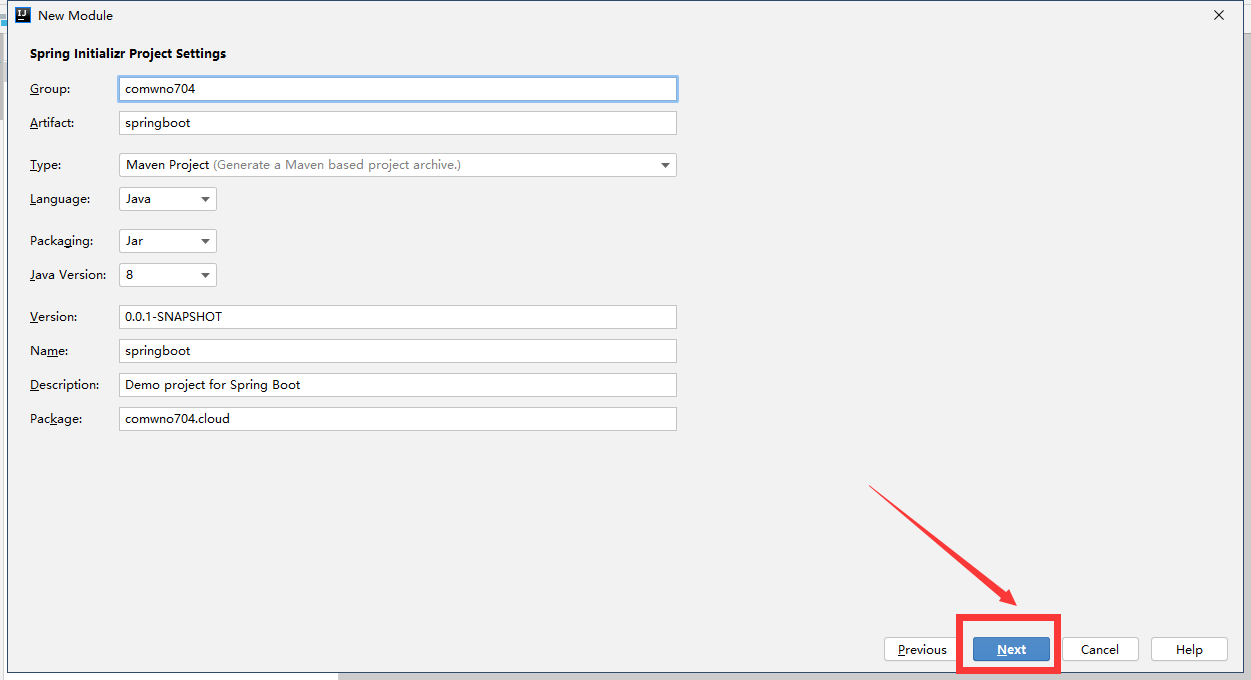
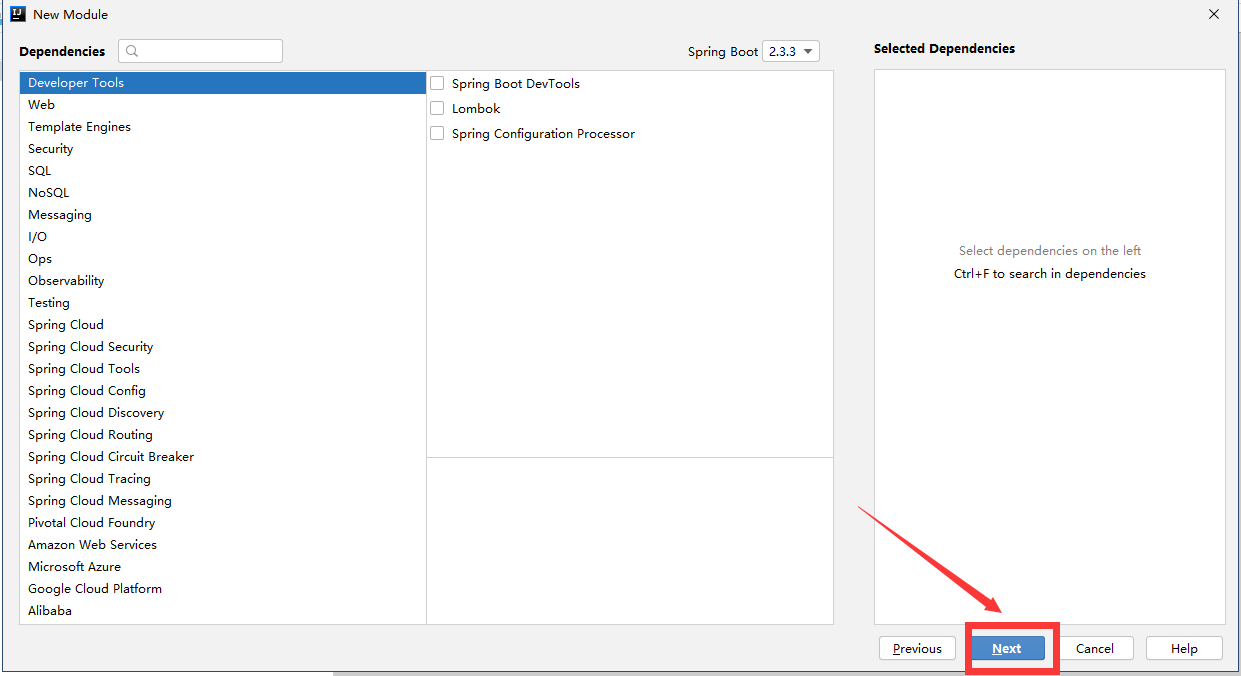
3> 输入包名等信息后,点击next
![]()
![]()
4> 输入模块名字和选择对应的路径,然后点击finish
![]()
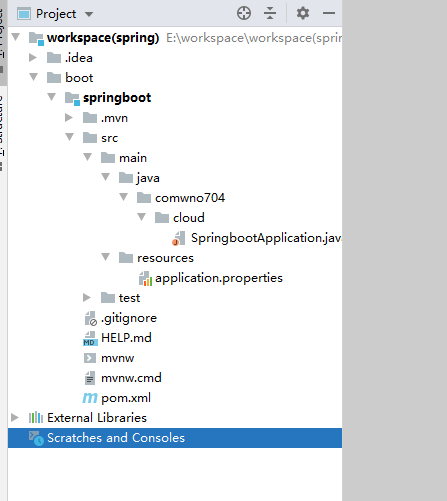
至此,我们一个最基础的springboot项目就创建好了,目录结构如下:
![]()
二、项目演示
2.1 启动类
项目根目录下生成了一个artifactId+Application命名规则的入口类,为了演示简单,不再新建控制器,直接在入口类中编写代码:
1
2
3
4
5
6
7
8
9
10
11
12
13
14
15
16
17
18
19
20
21
| package com.wno704.boot;
import org.springframework.boot.SpringApplication;
import org.springframework.boot.autoconfigure.SpringBootApplication;
import org.springframework.web.bind.annotation.RequestMapping;
import org.springframework.web.bind.annotation.RestController;
@RestController
@SpringBootApplication
public class BootApplication {
public static void main(String[] args) {
SpringApplication.run(BootApplication.class, args);
}
@RequestMapping("/")
String index() {
return "hello spring boot";
}
}
|
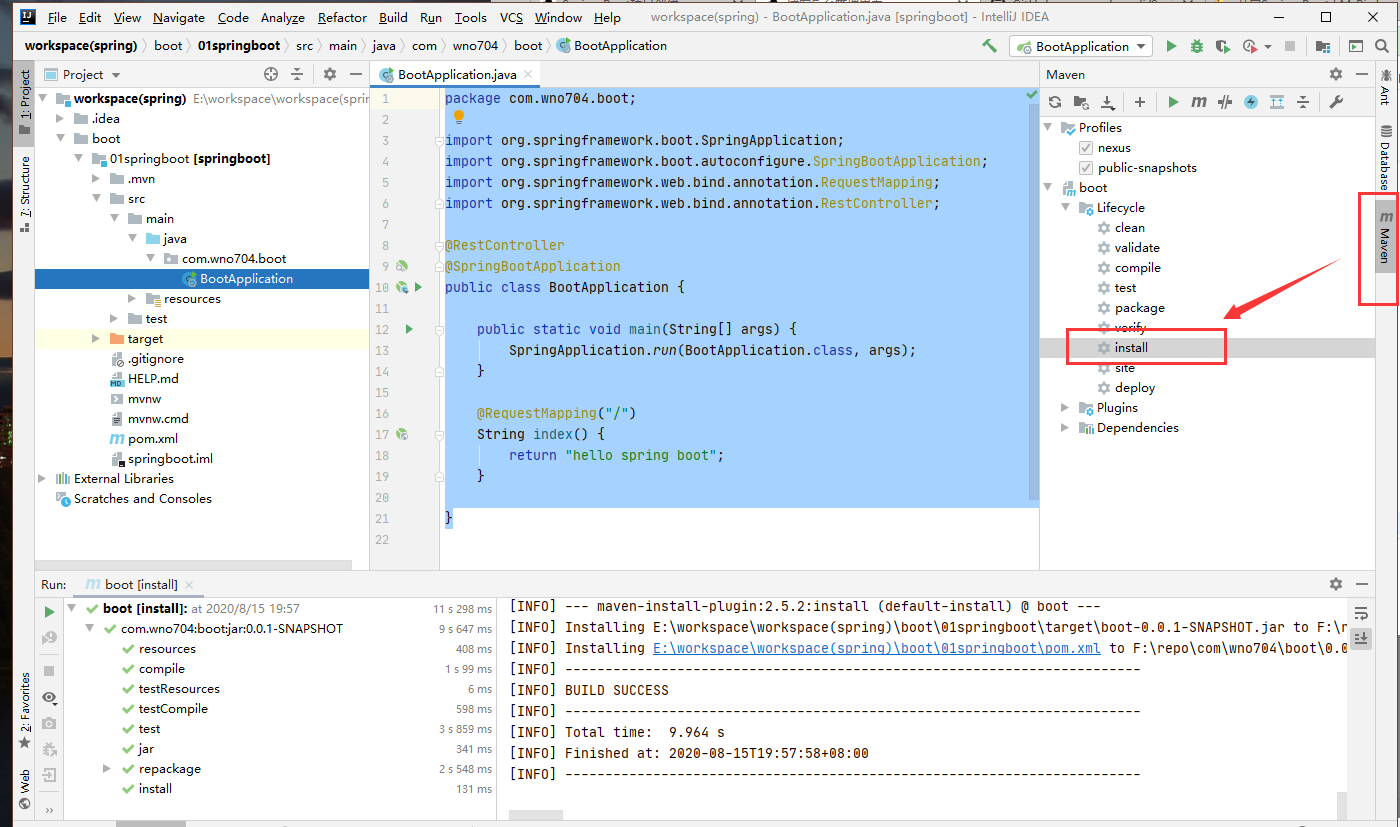
2.2 使用maven构建项目
![]()
2.3 运行项目
点击run或者debug都可以,这里我们点击了debug
![]()
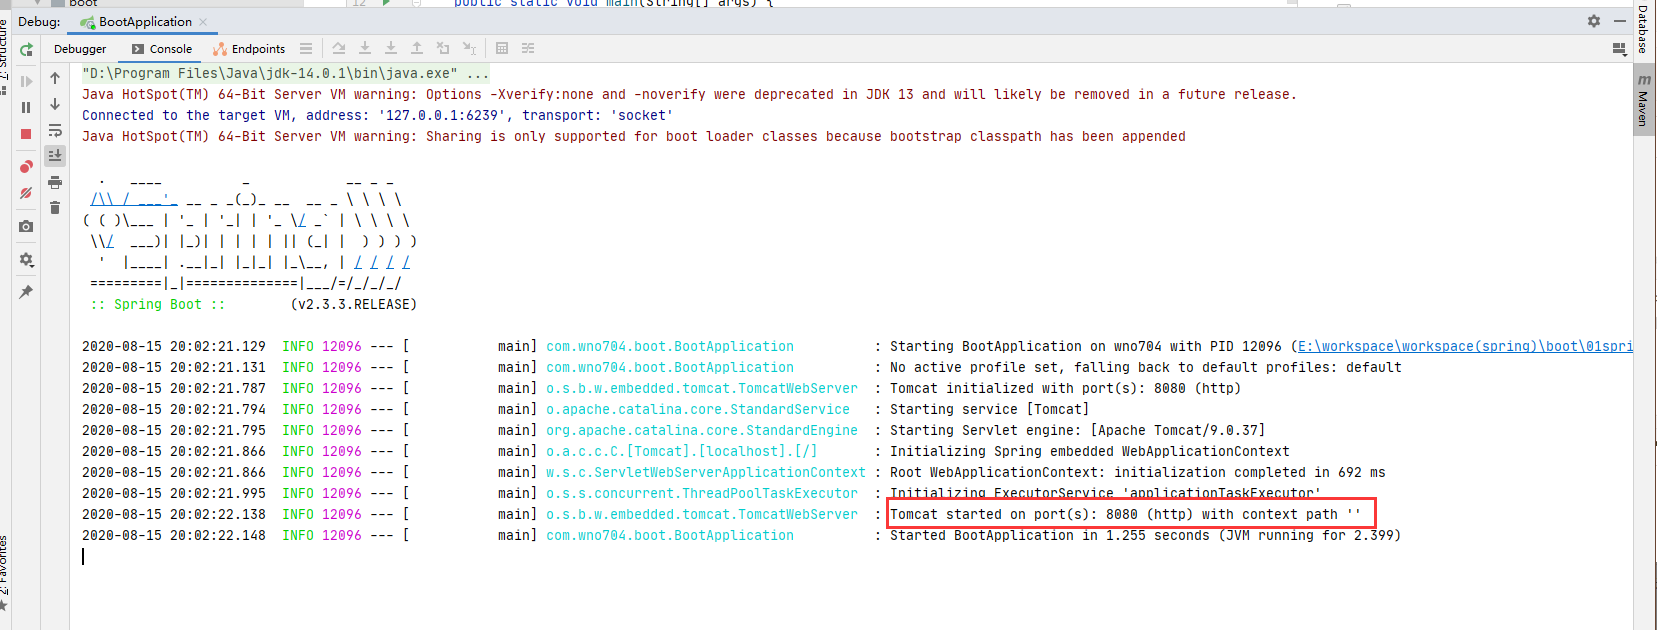
项目启动成功,如下所示:
![]()
2.4 测试项目
浏览器访问: http://localhost:8080
会显示如下:
![]()
三、打包发布
3.1 打包成可执行的 jar 包
默认情况下,通过 maven 执行 package 命令后,会生成 jar 包,且该 jar 包会内置了 tomcat 容器,因此我们可以通过 java -jar 就可以运行项目,如下图:
当用maven构建项目成功后,会在项目target目录下生成发布包,如下图:
![]()
3.2 打包成部署的 war 包
1>让 SpringbootApplication 类继承 SpringBootServletInitializer 并重写 configure 方法,如下:
1
2
3
4
5
6
7
8
9
10
11
12
| @SpringBootApplication
public class SpringbootApplication extends SpringBootServletInitializer {
@Override
protected SpringApplicationBuilder configure(SpringApplicationBuilder application) {
return application.sources(SpringbootApplication.class);
}
public static void main(String[] args) {
SpringApplication.run(SpringbootApplication.class, args);
}
}
|
2>修改 pom.xml 文件,将 jar 改成 war,如下:
<packaging>war</packaging>
在标签内配置项目名
1
2
3
4
5
6
| ...
<build>
...
<finalName>wno704</finalName>
</build>
...
|
3>移除内置 tomcat:
1
2
3
4
5
6
7
8
9
10
11
12
13
14
15
16
17
18
| <dependency>
<groupId>org.springframework.boot</groupId>
<artifactId>spring-boot-starter-web</artifactId>
<!-- 打 war 包时,排除内置 tomcat,需要放开下边的注释 -->
<exclusions>
<exclusion>
<groupId>org.springframework.boot</groupId>
<artifactId>spring-boot-starter-tomcat</artifactId>
</exclusion>
</exclusions>
</dependency>
<!--war打包的时候可以不用包进去,别的设施会提供。事实上该依赖理论上可以参与编译,测试,运行等周期。相当于compile,但是打包阶段做了exclude操作-->
<dependency>
<groupId>org.springframework.boot</groupId>
<artifactId>spring-boot-starter-tomcat</artifactId>
<scope>provided</scope>
</dependency>
|
打包成功后,将 war 包部署到 tomcat 容器中运行即可。
四、pom.xml解释
4.1 pom.xml
打开pom.xml可看到配置如下:
1
2
3
4
5
6
7
8
9
10
11
12
13
14
15
16
17
18
19
20
21
22
23
24
25
26
27
28
29
30
31
32
33
34
35
36
37
38
39
40
41
42
43
44
45
46
47
48
49
| <?xml version="1.0" encoding="UTF-8"?>
<project xmlns="http://maven.apache.org/POM/4.0.0" xmlns:xsi="http://www.w3.org/2001/XMLSchema-instance"
xsi:schemaLocation="http://maven.apache.org/POM/4.0.0 https://maven.apache.org/xsd/maven-4.0.0.xsd">
<modelVersion>4.0.0</modelVersion>
<parent>
<groupId>org.springframework.boot</groupId>
<artifactId>spring-boot-starter-parent</artifactId>
<version>2.3.3.RELEASE</version>
<relativePath/> <!-- lookup parent from repository -->
</parent>
<groupId>com.wno704</groupId>
<artifactId>boot</artifactId>
<version>0.0.1-SNAPSHOT</version>
<name>boot</name>
<description>Demo project for Spring Boot</description>
<properties>
<java.version>1.8</java.version>
</properties>
<dependencies>
<dependency>
<groupId>org.springframework.boot</groupId>
<artifactId>spring-boot-starter-web</artifactId>
</dependency>
<dependency>
<groupId>org.springframework.boot</groupId>
<artifactId>spring-boot-starter-test</artifactId>
<scope>test</scope>
<exclusions>
<exclusion>
<groupId>org.junit.vintage</groupId>
<artifactId>junit-vintage-engine</artifactId>
</exclusion>
</exclusions>
</dependency>
</dependencies>
<build>
<plugins>
<plugin>
<groupId>org.springframework.boot</groupId>
<artifactId>spring-boot-maven-plugin</artifactId>
</plugin>
</plugins>
</build>
</project>
|
4.2 spring-boot-starter-parent
spring-boot-starter-parent指定了当前项目为一个Spring Boot项目,它提供了诸多的默认Maven依赖,具体可查看目录F:\repo\org\springframework\boot\spring-boot-dependencies\2.3.3.RELEASE下的spring-boot-dependencies-2.3.3.RELEASE.pom文件
1
2
3
4
5
6
7
8
9
10
11
12
13
14
15
16
17
18
19
20
21
22
23
24
25
26
27
28
29
30
31
32
33
| <properties>
......
<solr.version>8.5.2</solr.version>
<spring-amqp.version>2.2.10.RELEASE</spring-amqp.version>
<spring-batch.version>4.2.4.RELEASE</spring-batch.version>
<spring-data-releasetrain.version>Neumann-SR3</spring-data-releasetrain.version>
<spring-framework.version>5.2.8.RELEASE</spring-framework.version>
<spring-hateoas.version>1.1.1.RELEASE</spring-hateoas.version>
<spring-integration.version>5.3.2.RELEASE</spring-integration.version>
<spring-kafka.version>2.5.5.RELEASE</spring-kafka.version>
<spring-ldap.version>2.3.3.RELEASE</spring-ldap.version>
<spring-restdocs.version>2.0.4.RELEASE</spring-restdocs.version>
<spring-retry.version>1.2.5.RELEASE</spring-retry.version>
<spring-security.version>5.3.4.RELEASE</spring-security.version>
<spring-session-bom.version>Dragonfruit-RELEASE</spring-session-bom.version>
<spring-ws.version>3.0.9.RELEASE</spring-ws.version>
<sqlite-jdbc.version>3.31.1</sqlite-jdbc.version>
<sun-mail.version>1.6.5</sun-mail.version>
<thymeleaf.version>3.0.11.RELEASE</thymeleaf.version>
<thymeleaf-extras-data-attribute.version>2.0.1</thymeleaf-extras-data-attribute.version>
<thymeleaf-extras-java8time.version>3.0.4.RELEASE</thymeleaf-extras-java8time.version>
<thymeleaf-extras-springsecurity.version>3.0.4.RELEASE</thymeleaf-extras-springsecurity.version>
<thymeleaf-layout-dialect.version>2.4.1</thymeleaf-layout-dialect.version>
<tomcat.version>9.0.37</tomcat.version>
<unboundid-ldapsdk.version>4.0.14</unboundid-ldapsdk.version>
<undertow.version>2.1.3.Final</undertow.version>
<versions-maven-plugin.version>2.7</versions-maven-plugin.version>
<webjars-hal-browser.version>3325375</webjars-hal-browser.version>
<webjars-locator-core.version>0.45</webjars-locator-core.version>
<wsdl4j.version>1.6.3</wsdl4j.version>
<xml-maven-plugin.version>1.0.2</xml-maven-plugin.version>
<xmlunit2.version>2.7.0</xmlunit2.version>
</properties>
|
需要说明的是,并非所有在标签中配置了版本号的依赖都有被启用,其启用与否取决于您是否配置了相应的starter。比如tomcat这个依赖就是spring-boot-starter-web的传递性依赖(下面将会描述到)。
当然,我们可以手动改变这些依赖的版本。比如我想把thymeleaf的版本改为3.0.0.RELEASE,我们可以在pom.xml中进行如下配置:
1
2
3
| <properties>
<thymeleaf.version>3.0.0.RELEASE</thymeleaf.version>
</properties>
|
4.3 spring-boot-starter-web
Spring Boot提供了许多开箱即用的依赖模块,这些模块都是以spring-boot-starter-XX命名的。比如要开启Spring Boot的web功能,只需要在pom.xml中配置spring-boot-starter-web即可:
1
2
3
4
| <dependency>
<groupId>org.springframework.boot</groupId>
<artifactId>spring-boot-starter-web</artifactId>
</dependency>
|
因为其依赖于spring-boot-starter-parent,所以这里可以不用配置version。保存后Maven会自动帮我们下载spring-boot-starter-web模块所包含的jar文件。
我们也可以手动排除一些我们不需要的依赖。
比如spring-boot-starter-web默认集成了tomcat,假如我们想把它换为jetty,可以在pom.xml中spring-boot-starter-web下排除tomcat依赖,然后手动引入jetty依赖:
1
2
3
4
5
6
7
8
9
10
11
12
13
14
15
16
| <dependencies>
<dependency>
<groupId>org.springframework.boot</groupId>
<artifactId>spring-boot-starter-web</artifactId>
<exclusions>
<exclusion>
<groupId>org.springframework.boot</groupId>
<artifactId>spring-boot-starter-tomcat</artifactId>
</exclusion>
</exclusions>
</dependency>
<dependency>
<groupId>org.springframework.boot</groupId>
<artifactId>spring-boot-starter-jetty</artifactId>
</dependency>
</dependencies>
|
4.4 spring-boot-maven-plugin
spring-boot-maven-plugin为Spring Boot Maven插件,提供了:
把项目打包成一个可执行的超级JAR(uber-JAR),包括把应用程序的所有依赖打入JAR文件内,并为JAR添加一个描述文件,其中的内容能让你用java -jar来运行应用程序。
搜索public static void main()方法来标记为可运行类。
代码下载